Event Submission Page Settings
To access the event submission settings page, follow the below mentioned steps.
Go to Event Manager >> Settings >> Event Submission tab.

Account Required:
This account refers to the account that a user needs to create to post an event listing. Disabling this would mean that any user, who’s not logged into his account, can submit an event.
- Go to Event Manager >> Settings >> Event Submission tab.
- Tick the box next to Account Required.
- Click Save Changes.

Account Creation:
If a user has no account then he or she will be able to create an account while posting an event.
- Go to Event Manager >> Settings >> Event Submission tab.
- Check the box next to Account Creation.
- Click Save Changes.

Account Username
If the “Account Creation” option is enabled and “Account Username” is also enabled then a username will be created from the email address given at the time of posting an event.
- Go to Event Manager >> Settings >> Event Submission tab.
- Check the box next to Account Username.
- Click Save Changes.

Account Password
If enabled, an email will be sent to the user with their username and a link to set their password. Otherwise, a password field will be shown and their email address won’t be verified.
- Go to Event Manager >> Settings >> Event Submission tab.
- Check the box next to Account Password.
- Click Save Changes.

Account Role
WP Event Manager allows you to set the Account Role whenever a new event is created with a user account. The Account Role section contains various roles in the drop down box.
- Go to Event Manager >> Settings >> Event Submission tab.
- Check the box next to Account Role.
- Click Save Changes.

Moderate New Listings
Using WP Event Manager, you can enable and disable the option “New Listing submissions require admin approval”. This gives you the right to decide if every new event listing needs admin approval.
- Go to Event Manager >> Settings >> Event Submission tab.
- Tick the box next to Moderate New Listings.
- Click Save Changes.

Allow Pending Edits
This option allows users to make changes or edit the submitted events that are waiting for the admin’s approval.
- Go to Event Manager >> Settings >> Event Submission tab.
- Tick the box next to Allow Pending Edits.
- Click Save Changes.

Allow Multiple Banners
WP Event Manager allows you to enable or disable the option to add multiple banners at the frontend and backend.
- Go to Event Manager >> Settings >> Event Submission tab.
- Tick the box next to Allow Multiple Banners.
- Click Save Changes.

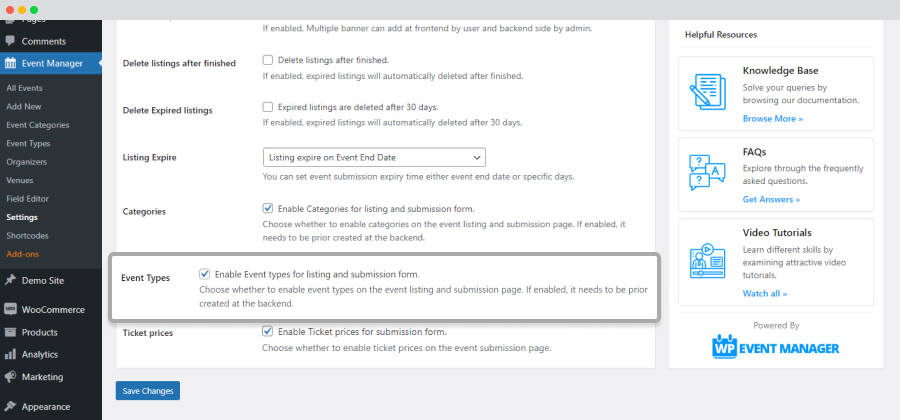
Delete listings After Finished
WP Event Manager gives you the exclusive right to decide if you want to keep or delete your expired event listings. If you enable this option, the event data will be automatically deleted once it is over.

Delete Expired Listings
If you enable this option, your expired events will be deleted automatically after 30 days.

Listing Expire
This option allows you to set the event expiry date. By default the option remains “Listing expires on event end date”. You can change it and set the time based on the options available in the dropdown.

Enabling categories for event listings in the event submission form
With WP Event Manager, a user can decide if they want to enable or disable categories for the event listings and submission.
The user can do this using the Categories option present in the event submission settings page.

Enabling Event types for event listings in the submission form
WP Event Manager allows the admin to enable or disable the Event Types for event listings in the event submission page.
Tick mark the box present beside the Event Types option at the event submission page settings.

Enabling Price Field
Using WP Event Manager you can enable or disable displaying ticket prices for listings.
To enable the option, tick mark the box present beside the Ticket Prices option at the event submission page settings.

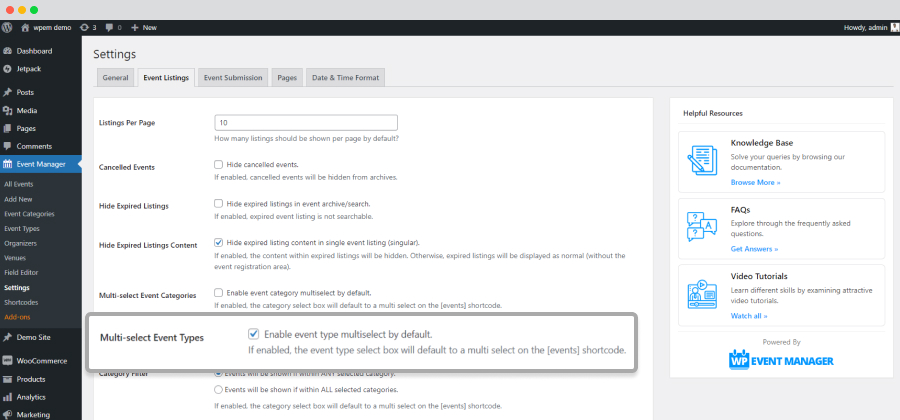
Multi-select Event types for event Submission
Using WP Event Manager you can add tags to event listings. By enabling this option, an event can be tagged with multiple types.
Tick the box next to the Multi-select Event Types For Submission option to enable it and keep it empty to disable.

Multi-select Event Category for event Submission
Using WP Event Manager, you can add categories to event listings. By enabling this option, each event can be classified into multiple categories.
Tick the box next to the Multi-select Event Category For Submission option to enable it and keep it empty to disable.

