Frontend Event Dashboard for Organizer
Event organizers need to create an account on the website to post their events. WP Event Manager gives these organizers the freedom to manage their event listings through the Frontend Event Dashboard.
In this guide, we will introduce you to the Frontend Event Dashboard and how it works.
To access the dashboard, you need to follow the below mentioned steps:
- Log into your account.
- Go to the Event Dashboard.
Default event dashboard
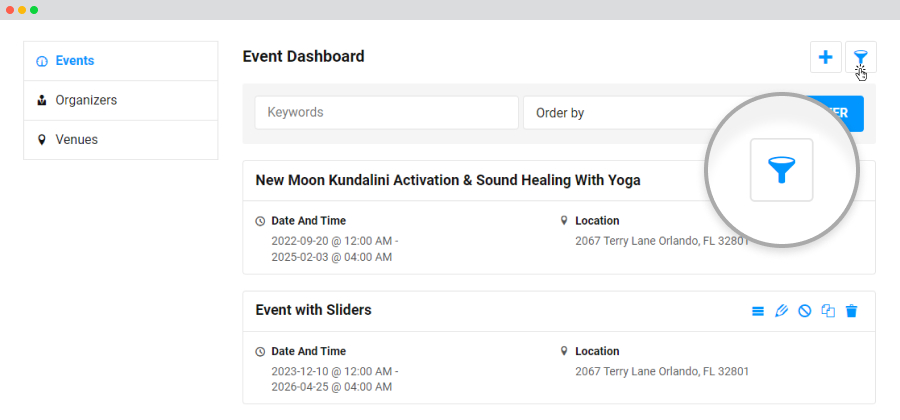
The frontend event dashboard offers some functions that allow you to manage the submitted events.
- Details: The box icon in the event dashboard signifies the details of the events. When you click on the box icon it shows you the details of a specific event.
- Edit: The pencil icon in the event dashboard allows you to edit a specific event.
- Cancel: The Cancel icon in the event dashboard allows you to mark an event as canceled or not canceled.
- Duplicate: the two sheet icon in the event dashboard is used to duplicate an event.
- Delete: The bin icon in the event dashboard allows you to delete a specific event.

How to edit the submitted event?
To edit a submitted event, you need to follow the below mentioned steps:
- Go to the Event Dashboard >> Edit.
- Edit the event in the Submission Form that opens.

How to delete the submitted event?
To delete a submitted event, you need to follow the below mentioned steps:
- Go to Event Dashboard >> Delete.
- Click Ok.
- The event is deleted.

Filtering and Adding new Events on the Frontend Dashboard:
Users can also filter events from the entire list of events present on the event dashboard.
To filter events and get the details of a specific event, a user needs to click on the Funnel icon present right beside the Event Dashboard.

By Clicking on the funnel option, a user can see the following options on basis of which events will be filtered:
- Keyword: Type the name of the Event.
- OrderBy: Specify their order as per your requirement.

Similarly to add a new event, you need to click on the Plus sign present right beside the Event Dashboard.

Organizers Dashboard
Users can access the Organizers dashboard on the event dashboard page where they can find the details of the organizers.
To have the organizers dashboard on the event dashboard page, users need to enable the “Enable Organizer” option in the General Settings.

To access the organizers dashboard, here are the steps you need to take:
- Go to the Event Dashboard.
- Click on the Organizers option, present just under the Events at the left side of the page.
Here you can get the list of all Organizers of logged-in users along with their events and details. Here you can also see the total number of events of a particular organizer and by clicking on that you will get the list of events added under that particular organizer.
WP Event Manager allows you to make changes to the list as per your requirements through the action buttons present right beside the name of each organizer.
You will find the following options in the action section of each organizer.
- Edit: The pencil icon present in the action section allows you to edit a specific organizer.
- Duplicate: the sheet icon present in the action section allows you to duplicate an organizer.
- Delete: The bin icon present in the action section allows you to delete an organizer.
- Go to the Venue Dashboard.
- Click on the Venue option, present just under the Organizers at the left side of the page.

Adding a New Organizer
The Plus sign present right beside the Organizer Dashboard needs to be clicked to add a new organizer in the list.

Venue Dashboard
Just like the organizer dashboard, users can also access the venue dashboard on the event details page where they can find the details of the organizers.
To have the Venue dashboard on the event dashboard page, users need to enable the “Enable Venue” option in the General Settings.

To access the organizers dashboard, here are the steps you need to take:
Here you can get the list of all Venues of the listed events and their details including the Venue names, details, events occurring in each venue and actions.
WP Event Manager allows you to make changes to the list of venues as per your requirements through the action buttons present right beside the name of each venue.
You will find the following options in the action section of each organizer.
- Edit: The pencil icon present in the action section allows you to edit a specific venue.
- Duplicate: the sheet icon present in the action section allows you to duplicate a venue.
- Delete: The bin icon present in the action section allows you to delete a venue.

Adding a new venue
The Plus sign present right beside the Venue Dashboard needs to be clicked to add a new venue in the list.

