Zoom
The Zoom addon offered by WP Event Manager is a one-stop solution for WordPress users that offers robust tools to conduct virtual meetings, conferences and more.
The Zoom addon is a very convenient tool for event organizers as it allows them to conduct virtual meetings, seminars, webinars, conferences and more directly from their website and registered attendees can easily join in the events through a secured link posted on the website.
Zoom and WordPress are separate products and not owned or managed by WP Event Manager. The price of the plugin does not include the price of a Zoom Subscription. Please visit Zoom site to know more.
Installing The Plugin
The installation process is the same for all the addons, offered by WP Event Manager. They can be both installed automatically and manually.
Automatic Installation: You can install the plugin from the backend of your WordPress. Click Here to see how you can install the plugin automatically.
Manual Installation: You can install the plugin manually using SFTP or FTP tool as well. Click Here to see how you can install the plugin manually.
Setting up Your Zoom Application by oAuth
Here are the steps to connect your account with Zoom and generate the key to use the plugin. The steps also cover the usage of Zoom settings.
- Log into the Zoom app marketplace.
- Go to Develop.
- Select the “Build an app” option from the dropdown.
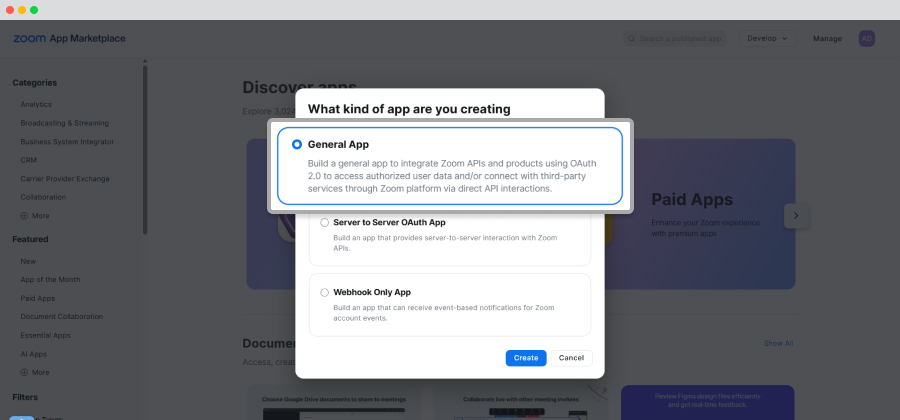
- A pop-up window will appear in which you need to select the “General app” option.
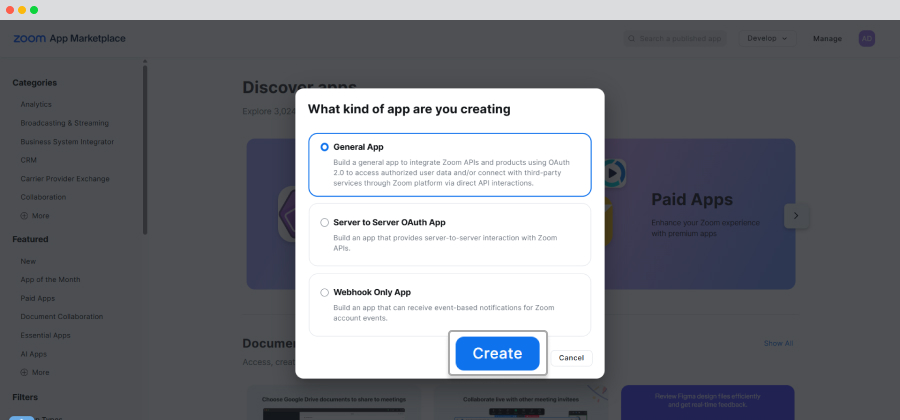
- Click on Create.
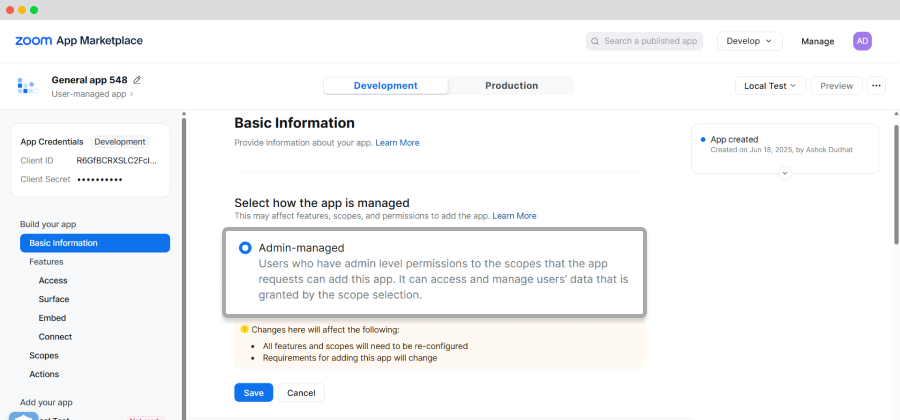
- You will be redirected to the Basic Information page.
- Under the “Select how the app is managed” section, you need to select the Admin-managed option.
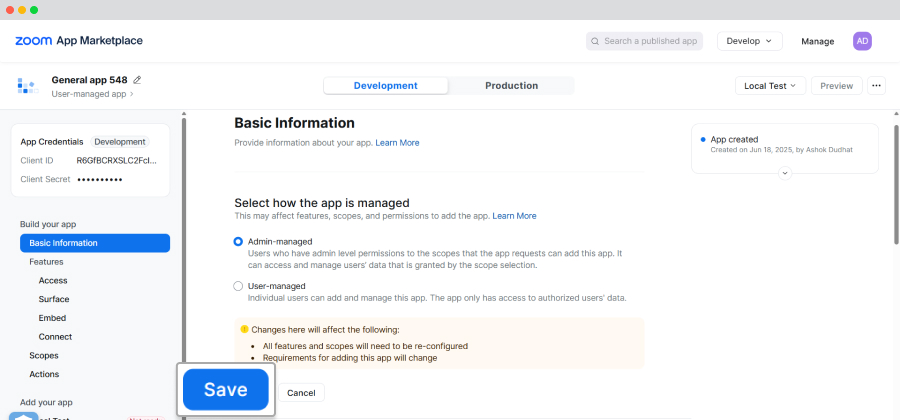
- Save.
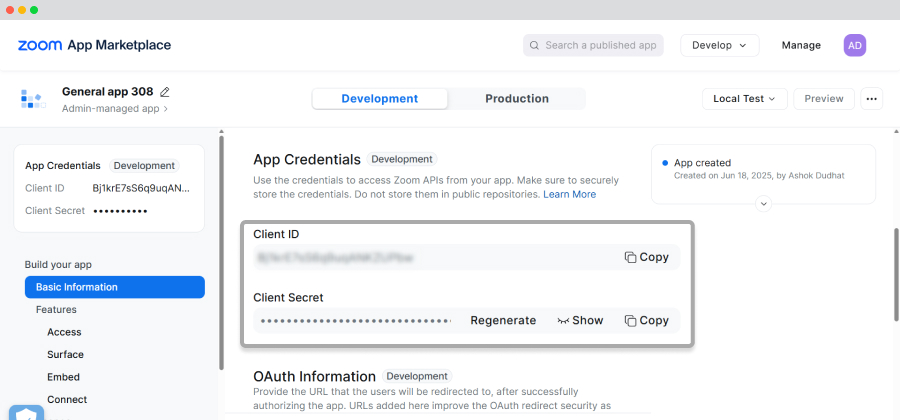
- Now you will find the “App Credential” section.
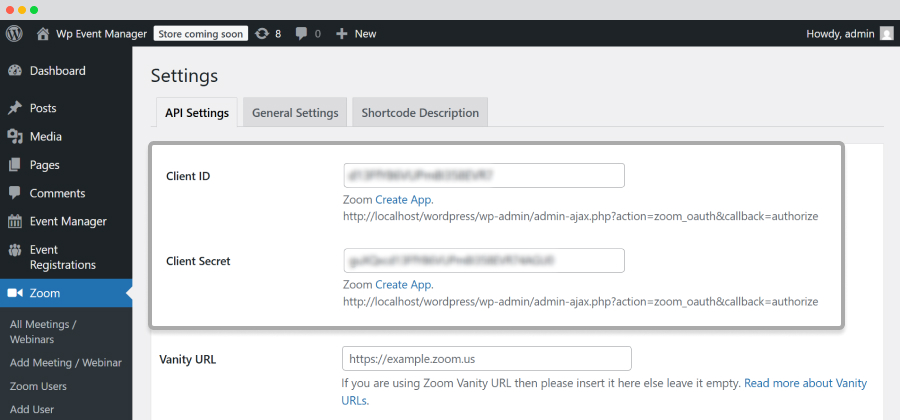
- You need to copy the client Id from this section and paste it to the ZOOM API settings’ Client ID box.
- Again copy the Client secret key and paste it to the Client secret box present at the Zoom API settings page.
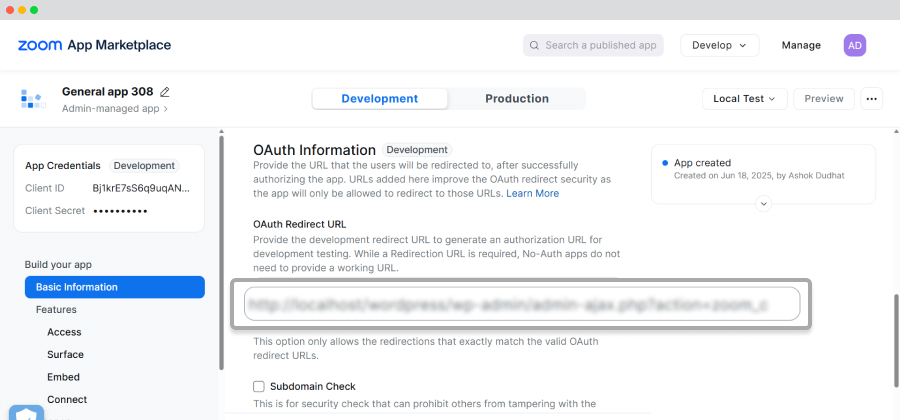
- Now you need to copy the link placed under the Zoom create app option and paste it to the OAuth redirected URL.
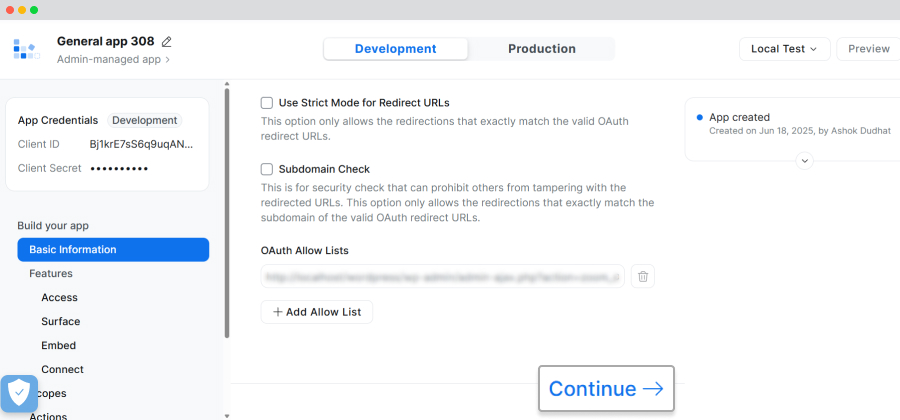
- Click on Continue.
- Then you will be taken to the Surface section and Select meetings.
- Press continue.
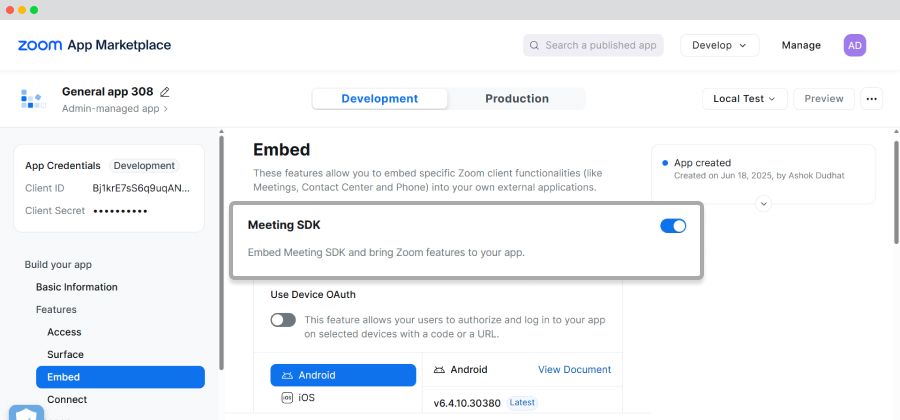
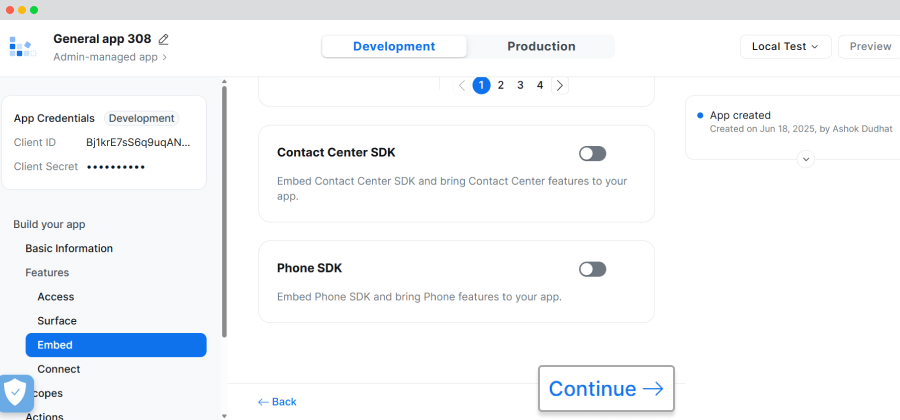
- You will come to the Embed page and enable the Meeting SDK option.
- Press Continue.
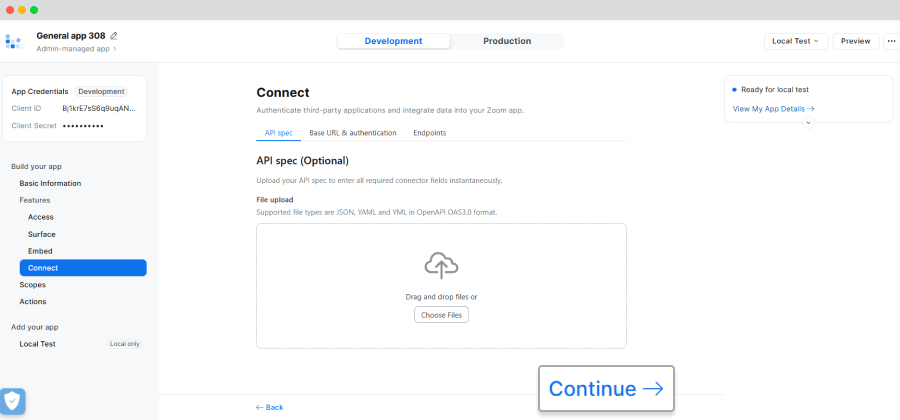
- You will be redirected to the Connect page and proceed with the Continue option.
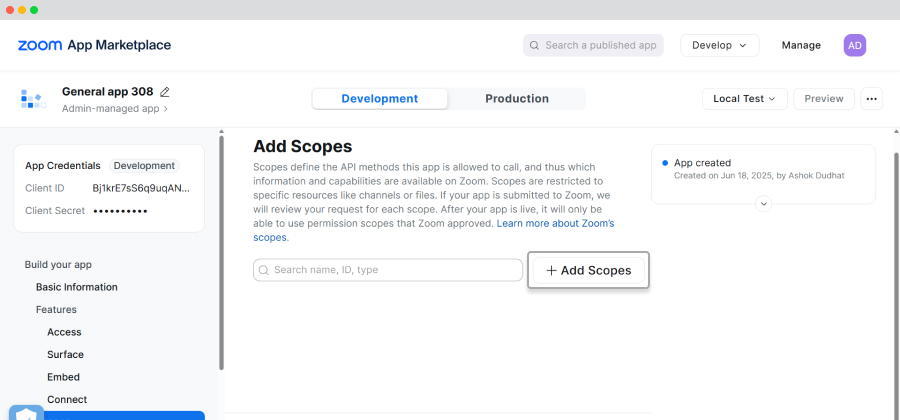
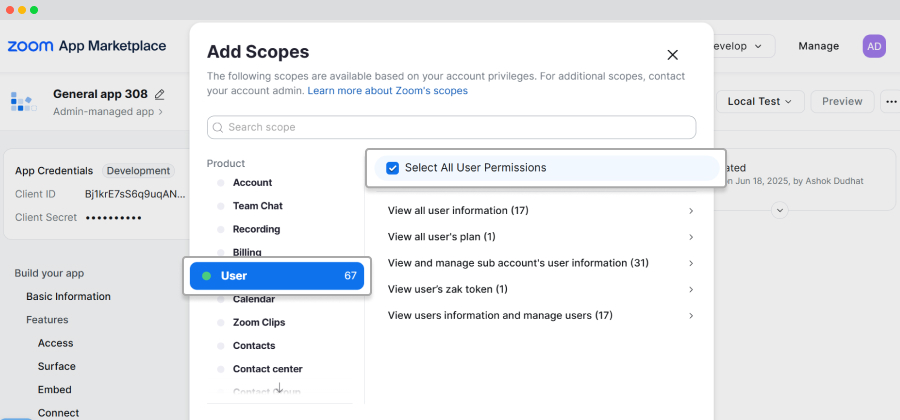
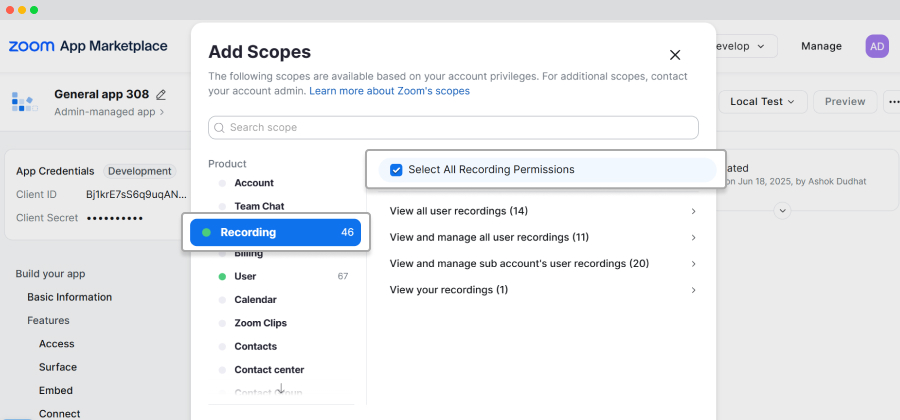
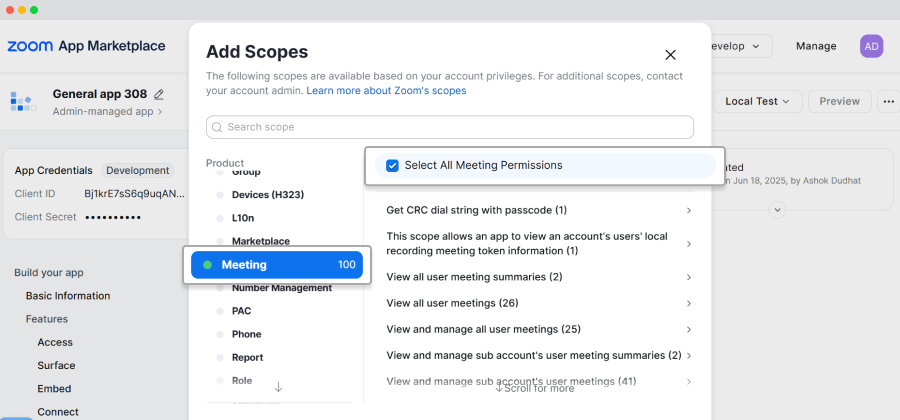
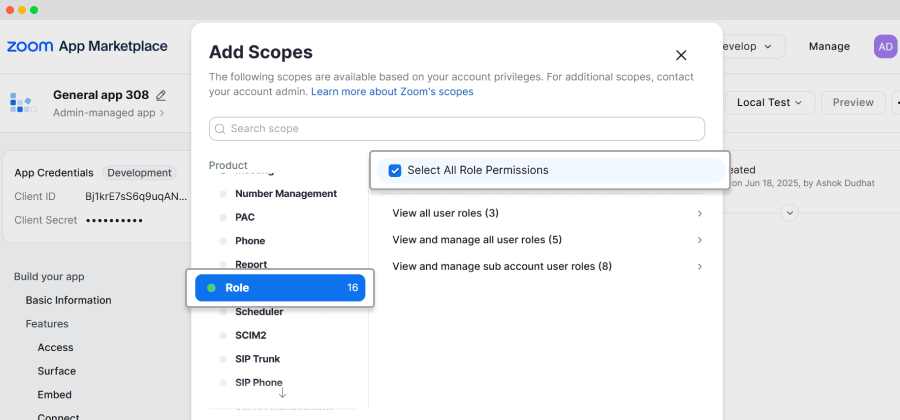
- After that, you will find the Add Scope page.
- Click on the Add Scope dropdown
- Select Users and press the “Select all user permissions”
- Press recording and select the “Select all recording permissions.”
- Go to Meeting and enable the “Select all meeting permissions” option.
- Go to role and enable the “Select all role permissions” option.
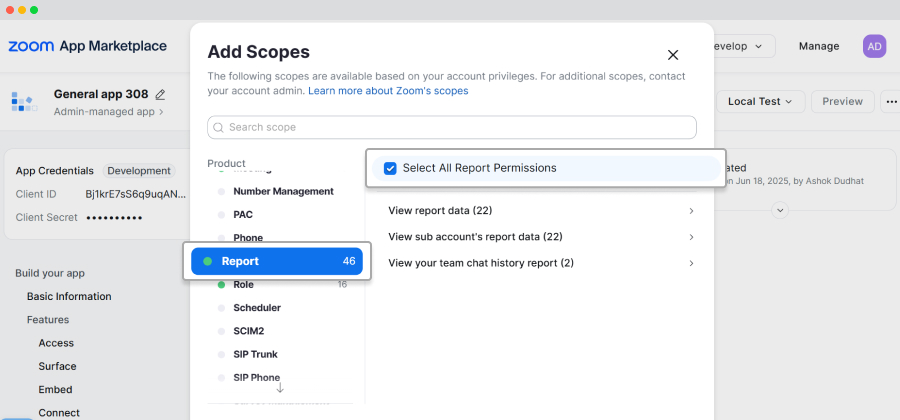
- Similarly, enable the “Select all report permissions” option from the report section.
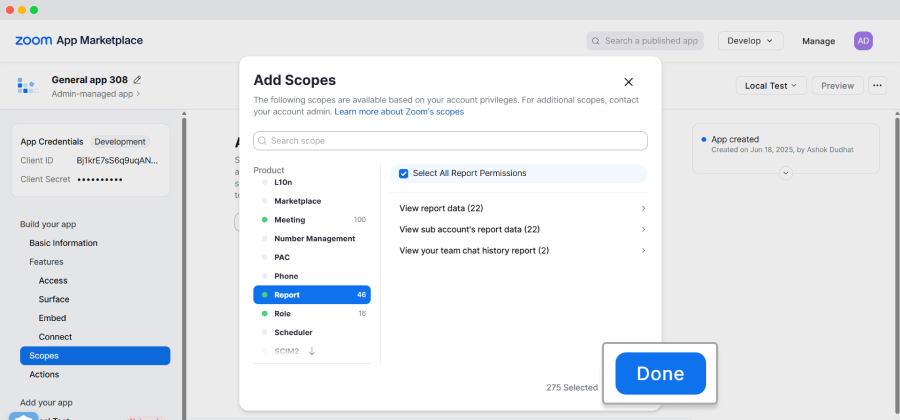
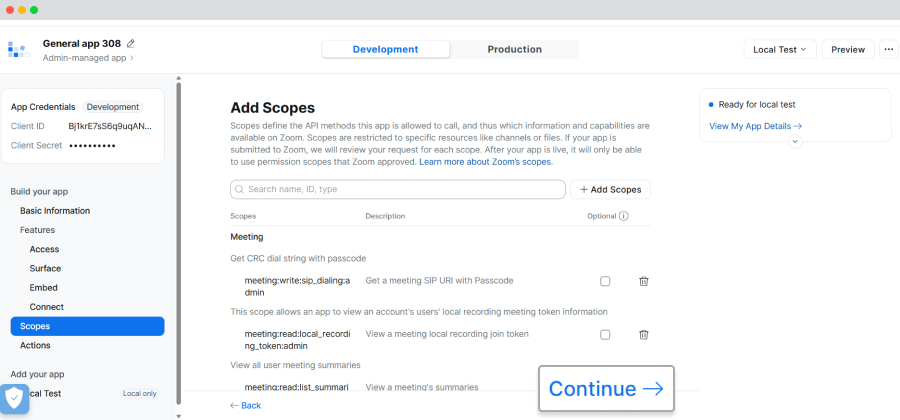
- Click on Done and then Continue.
- You will come to the Local test page.
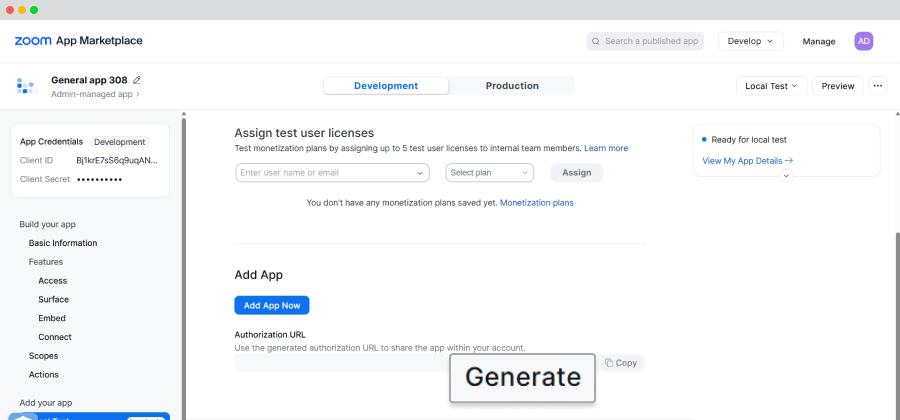
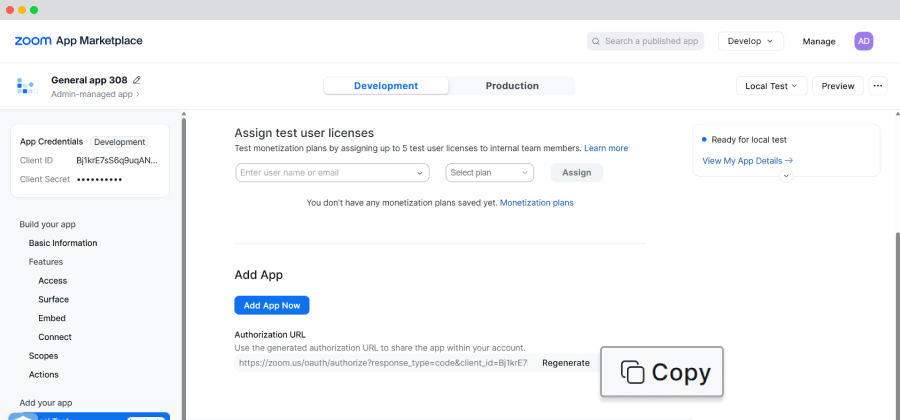
- In the Add App section, click on Generate and Copy the generated URL.
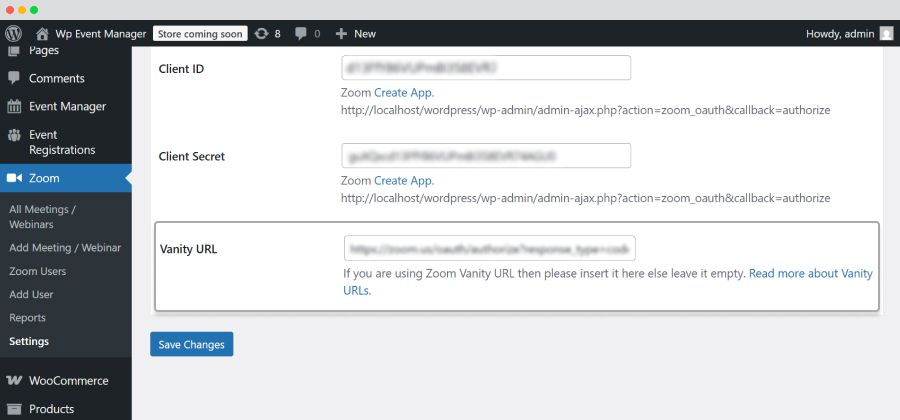
- Now paste the URL in the Zoom Setting’s Vanity URL section.
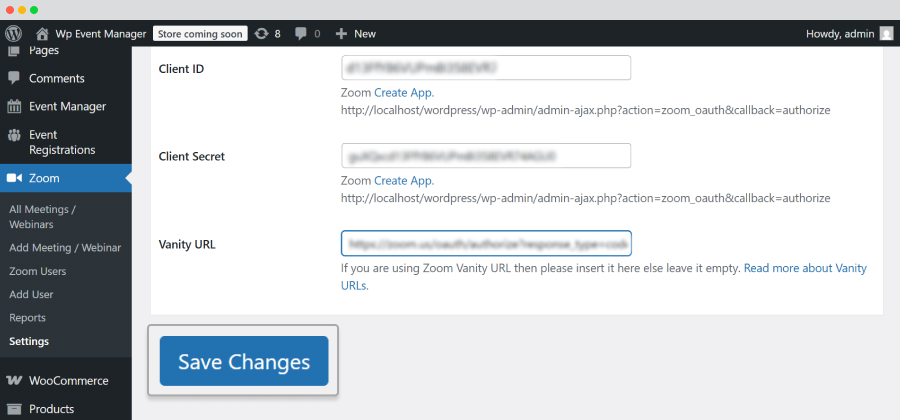
- Save changes.
- Then Disconnect Zoom Oauth.
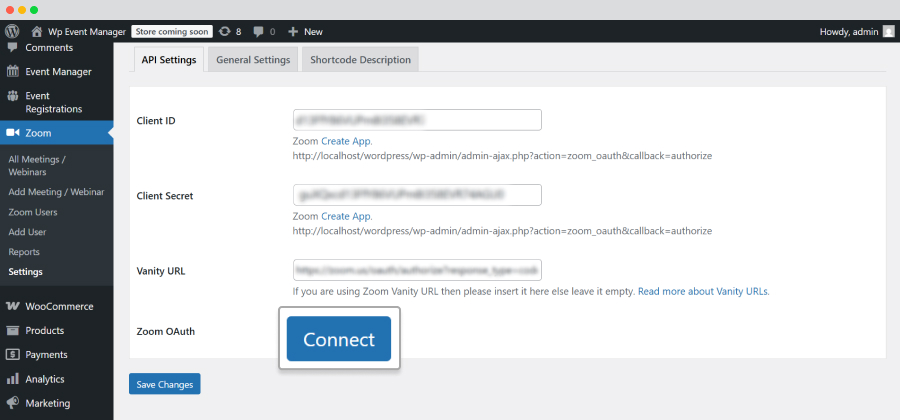
- Connect Zoom Oauth again.
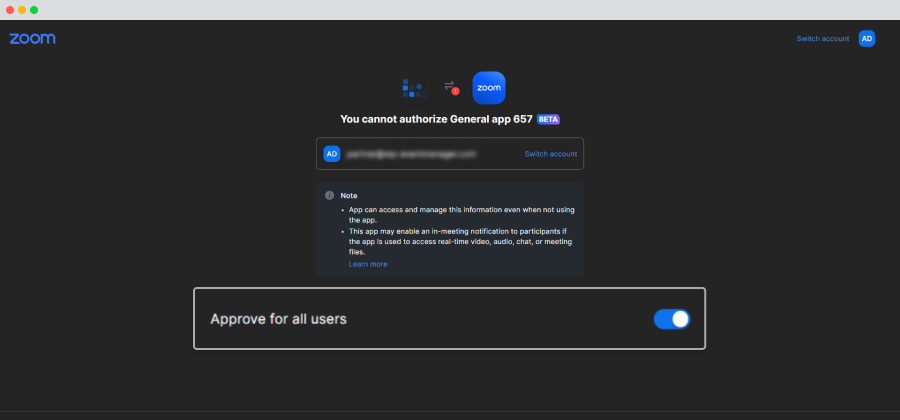
- You will be redirected to a new page suggesting “You can not authorize general ap (no)”
- Here you need to enable the “Approve for all users” option.
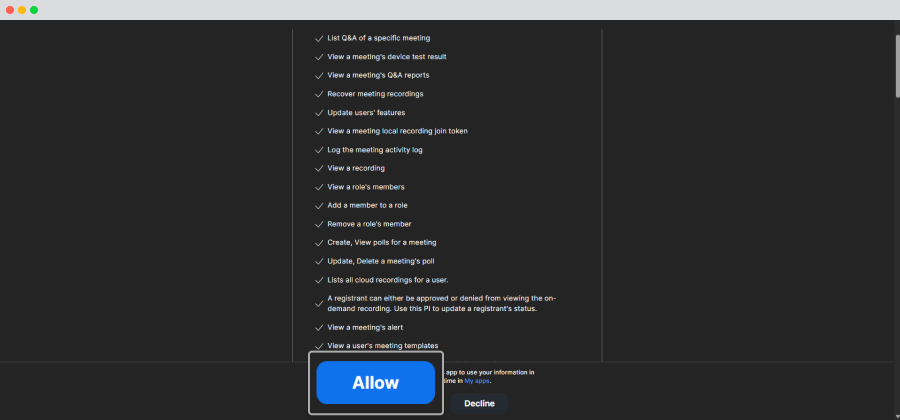
- Click on Allow.
What is a Vanity URL and how does it appear:
Vanity URL is the default way to change the zoom links. This is valid when the users have bought a custom URL from a zoom site to join or continue meetings.
-
Go to Wp Admin >> zoom >> settings.
-
Here, you will find an option called “Vanity URL”.
-
Changing or adding new values in the “Vanity URL” field will change the way links are displayed on the frontend.

Example:
If you add links such as “example.zoom.us” in the vanity URL textbox field, links displayed in the frontend pages would look like example.zoom.us/j/12312321 instead of the default zoom.us/j/1232321
So, change it only if you have a custom domain or you do not have default zoom.us/j/21321 link
General Settings.
- Go to Admin >> Zoom >> Settings >> General Settings.

- Enter the details as asked:
- Frontend Zoom Connection: Enabling this option allows admins to give organizers the right to create Zoom meetings from the frontend.
- Show Past Join Link: Enabling this option signifies that your meeting link will be displayed on the frontend even after the meeting.
- Show Zoom Author: Enabling this option allows you to display the Zoom Original Author in a single meeting page which has been created from Zoom meetings.
- Meeting Started Text: Mention the text that you want to display when the meeting starts.
- Meeting going to start Text: Mention the text that you want to display when the meeting is going to start.
- Meeting Ended Text: Mention the text you want to display when the meeting ends.
- Enable for all events: This option lets you display the above mentioned settings for all events.
- Show on a single event: Enabling this option signifies that the Zoom meeting details box will always appear on the single event page.
- Show on single event sidebar: Enabling this option allows you to l show your zoom meeting details on the sidebar of the single event page.
- Zoom Meeting/Webinar Dashboard Page: Select the page where you have placed the [zoom_meeting_dashboard] shortcode. This lets the plugin know where the dashboard is located.
- Submit Zoom Meeting/ Webinar Form Page: Select the page where you have placed the [submit_zoom_meeting_form] shortcode. This lets the plugin know where the form is located.
- Delete Data on Uninstall: If you enable this option, Zoom data will be removed when the plugin is removed. You can keep the option blank to disable the function.
- Save changes.
This will enable the integration of the zoom account of the host with the WP Event Manager.
Shortcode Description
The page displays examples of how various shortcodes would help you display events.
- Go to Admin >> Zoom >> Settings >> Shortcode Description.

-
In order to add a page to the frontend to create a Zoom Meeting, add the shortcode: [submit_zoom_meeting_form].
-
In order to add a page to the frontend to manage the Zoom Meeting, add the shortcode: [zoom_meeting_dashboard]
- [event_zoom_meeting]: Using this shortcode, you can display your zoom meeting on any page.
Attributes include:
- Meeting_id: Your meeting ID.
Example: [event_zoom_meeting meeting_id=”12345678985”]
- link_only: Yes or No – Adding yes will show join link only. Removing this parameter from the shortcode will output a description.
Example: [event_zoom_meeting meeting_id=”12345678985” link_only=”yes”]
- show_help: Yes or No – Adding yes will show join mobile app link only and download the mobile app.
Example: [event_zoom_meeting meeting_id=”12345678985” show_help=”yes”]
- [event_zoom_meeting_detail]: Using this shortcode, you can display your zoom meeting details on any page.
- ‘event_zoom_id’ = It displays the zoom meeting id.
- ‘show_title’ = Adding yes will show the zoom meeting title. If no then it will hide zoom meeting title.
Adding Meetings at the Backend
In order to create a Zoom meeting at the backend, follow the below mentioned steps:
- Go to the Admin >> Zoom >> Add New Meeting.

- Submit all the information about the meeting, including the title, meeting date and time, host and agenda, specifications about the timezone, and meeting duration.
- The details in regards to registrations and alternative hosts are available only for the pro Users(Zoom plan) and hence selecting any of these may hamper your meeting creation, in case if it is a free account.
- Publish the Meeting.
- Go to Admin >> zoom >> All Zoom.
- You can see the list of meetings created in the “All Zoom” section.

How to add a New webinar from the backend?
- Go to Wp–Admin >> Zoom >> Add New Meeting/Webinar.
- From the dropdown of Meeting type, Select Webinar.
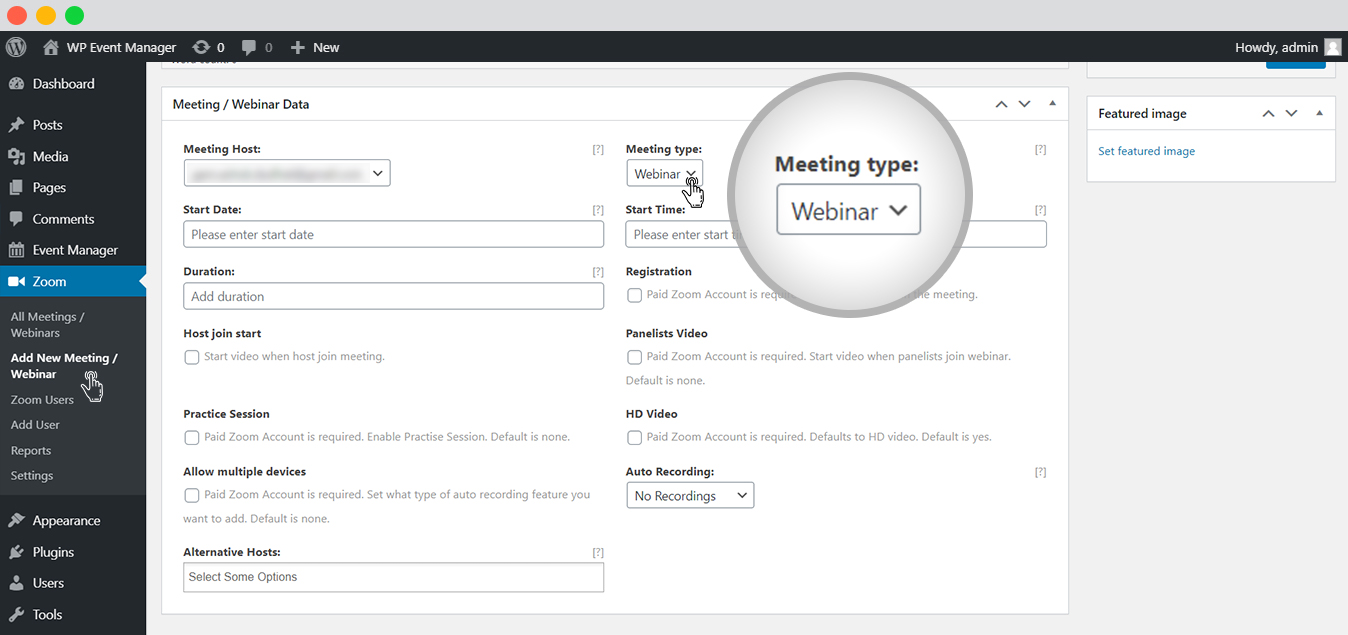
- Submit all the information about the Webinar, including the title, date and time, host and agenda, specifications about the timezone and duration.
- The details related to the registrations, Panelists Video, HD video, practice session, Allow multiple devices, and alternative hosts are available only for the pro Users(Zoom plan), and hence selecting any of these may hamper your meeting creation, in case if it is a free account.
- Publish the webinar.
- Go to Wp–Admin >> zoom >> All Meetings/webinars.

- You can see the list of meetings and webinars created in this section.
How to import a Zoom meeting into your WordPress site?
This feature allows you to import zoom meetings into your WordPress website from the zoom account if this meeting is not already available on your site.
In order to Import meeting, from your Zoom site to your WordPress panel, you need to follow the below-mentioned steps:
- Go to Admin >> Zoom >> All meetings.
- Click on Sync with zoom meetings.

- You would find the list of all the Zoom meetings in the section.
Add new users at the Backend
- Go to the Admin >> Zoom >> Add users.
- Fill in the following details:

1. Action: The Admin needs to choose from the available actions that a user needs to perform while managing Zoom meetings.
- “Create” – A user will receive an email from Zoom that contains the confirmation link. He or she needs to click on the link to activate his or her account to the Zoom service. Here, the user can change his or her password based on requirements.
- “Auto-Create” – This action is provided for the enterprise customers who have a managed domain. This feature is disabled by default because of the security risk involved in creating a user who does not belong to your domain without notifying the user.
- “Cust Create” – This action is provided to API partners only. Users created in this way have no password and are not able to log into the Zoom web site or client.
- “SSO Create” – This action is provided to only the enabled “Pre-provisioning SSO User” option. A user-created in this way has no password. If it is not a basic user, it will generate a Personal Vanity URL using the username (no domain) of the provisioning email. If the user name or PMI is invalid or occupied, it will use a random number/random personal vanity URL.
2. Email Address: The email address that would be used by a user.
3. First Name of the user.
4. Last Name of the user.
5. User Type :
- Basic: A basic user is a user without a paid license. A basic user can host meetings with up to 100 participants. If 3 or more participants join, the meeting will time out after 40 minutes. They cannot utilize users and account add-ons such as large meetings, webinars, or conference room connectors.
- Licensed: A licensed user is a paid account user who can host unlimited meetings on the public cloud. By default, they can host meetings with up to 100 participants and large meeting licenses are available for additional capacity.
- On-prem: An on-prem user is a paid account user who can host unlimited meetings with the on-premise meeting connector.
- Submit.
Zoom Users List at the Backend
In order to gain access to the list of all the users associated with the API mentioned, follow the below-mentioned steps:
- Go to Admin >> Zoom >> Zoom Users.
- Here, you get the list of all the users added to the same API.

- When you add users to a Zoom website, you get the option to sync all of these users through the Backend by simply clicking on the Sync Zoom Users option.
How to Bind Zoom Meetings with Events at the Backend?
- Go to Admin >> Event Manager >> Add New.
- Fill in the details of the events.
- In the zoom meetings section, select the zoom meeting you want to bind this event with.

- Update and publish.
Enable/ Disable Sidebar-box and zoom meeting details on the Event detail Page
In order to determine whether to display the details of Zoom meetings in the box or sidebar format, or keep both of them, a user needs to pass through a few simple backend settings.
Here are the steps to follow:
- In order to display the Sidebar displaying Zoom meetings, Go to admin >> zoom >> Settings >> General settings.
-
Enable the box “Show on single event sidebar”.

This will display the zoom meeting details at the sidebar.


This will display the zoom meeting box details on a single event listing page.

Recording Zoom Meeting
Zoom meetings can now be recorded with the WP Event Manager’s Zoom addon. To record any of your upcoming Zoom events, here are the steps you need to take:
- Create a new Zoom meeting at the front end.
- You will find a dropdown option at the bottom of the form named “Auto Recording”.
- Select the “cloud recording” option from the dropdown.
- Click on the Submit button.
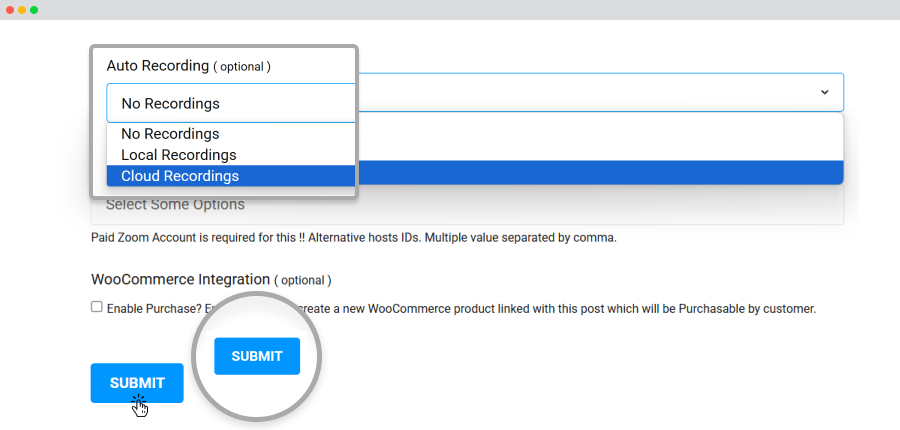
The meeting that you created will be recorded.
Adding the meeting to an event
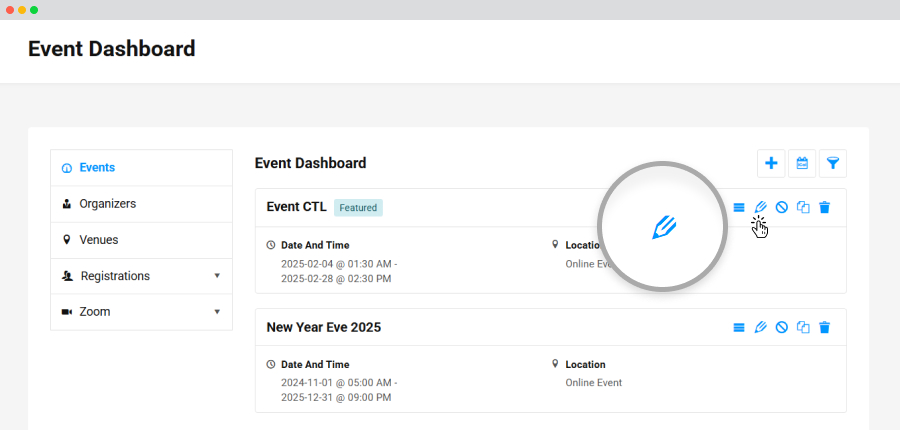
- Go to the event dashboard.
- Select the event for which you want to add the Zoom meeting you have created. For that need to click on the edit icon button.
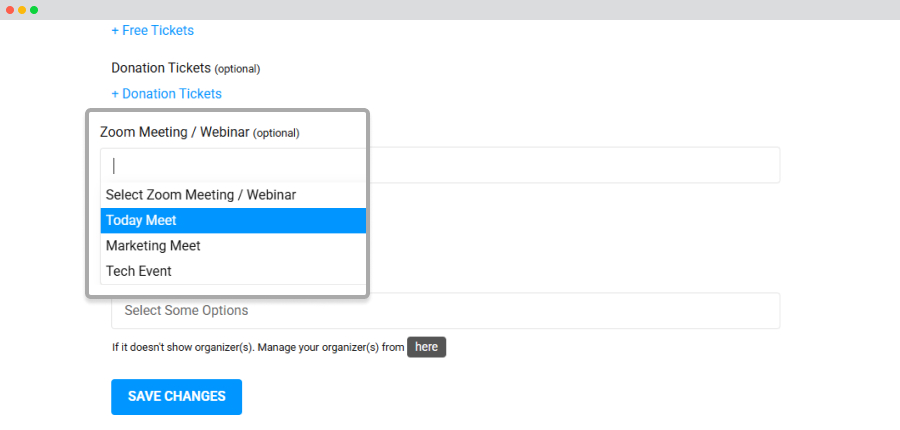
- On the edit event details page, you will find a Zoom Meeting / Webinar dropdown option containing all the Zoom meetings that you have created from which you need to select the name of the Zoom meeting that you need to add to the event.
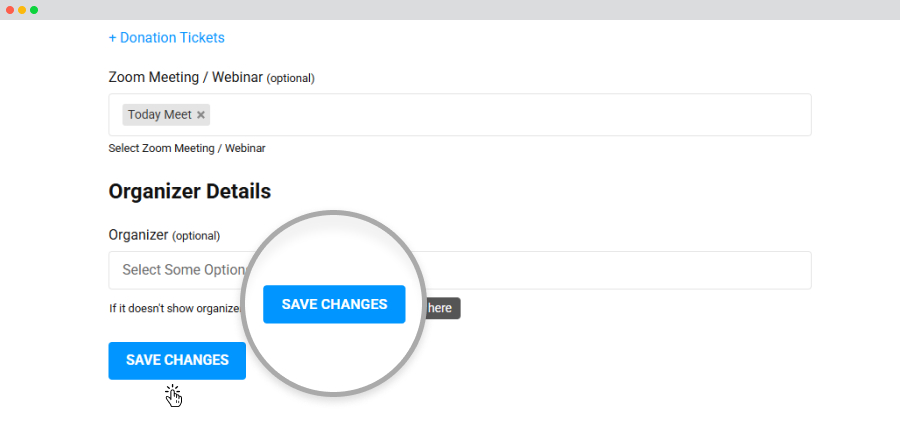
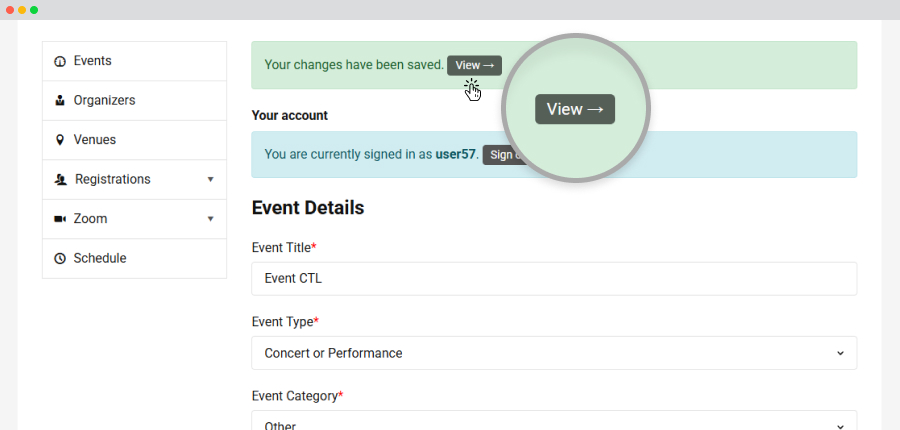
- Click on the save changes button.
- Click on the view button.
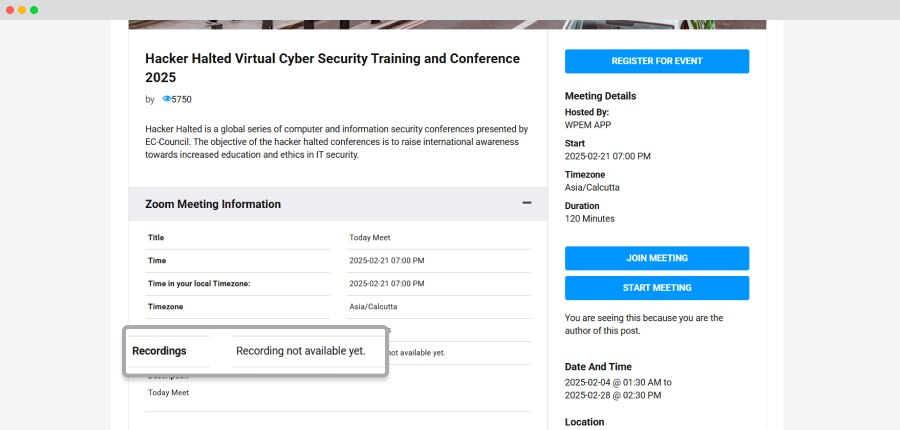
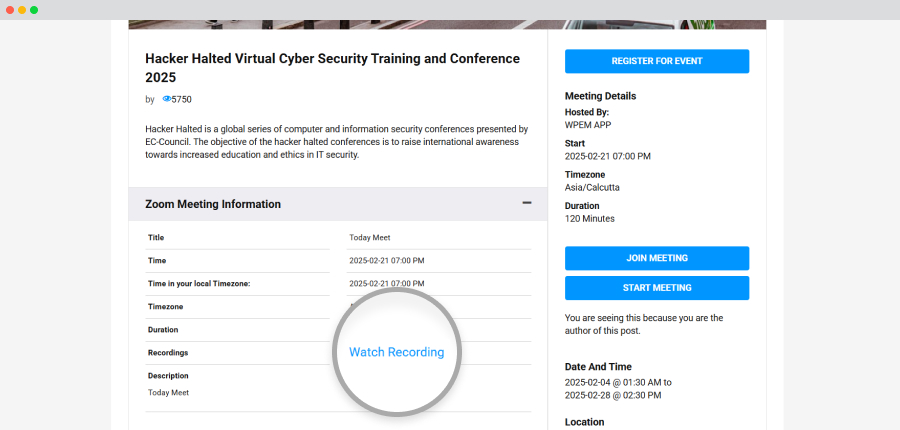
- Once you add it to the event, you will see the option “recording not available yet” in the Zoom meeting information section. This option will be available to only those meetings which you want to record.
- For the meetings that are to be recorded, the “recording” option appears at the top of the meeting clicking on which you can start and stop the recording.
- Once the meeting is recorded, the Zoom meeting information section of the event will show the option “watch recording.” You can click on this option to watch and download the recorded Zoom meeting.
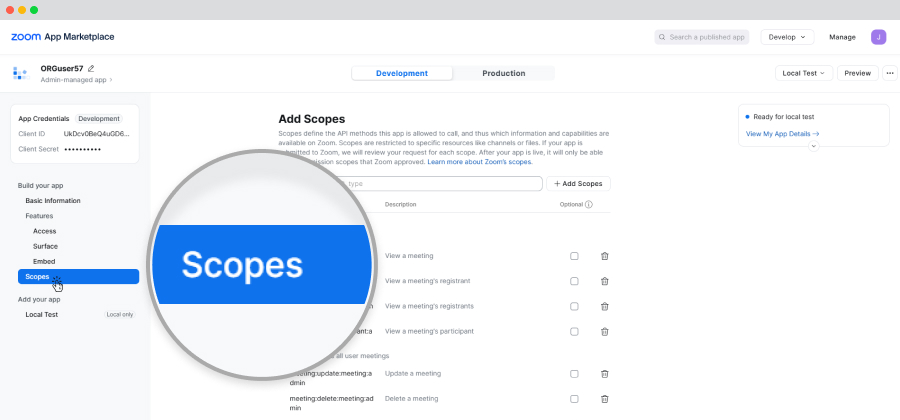
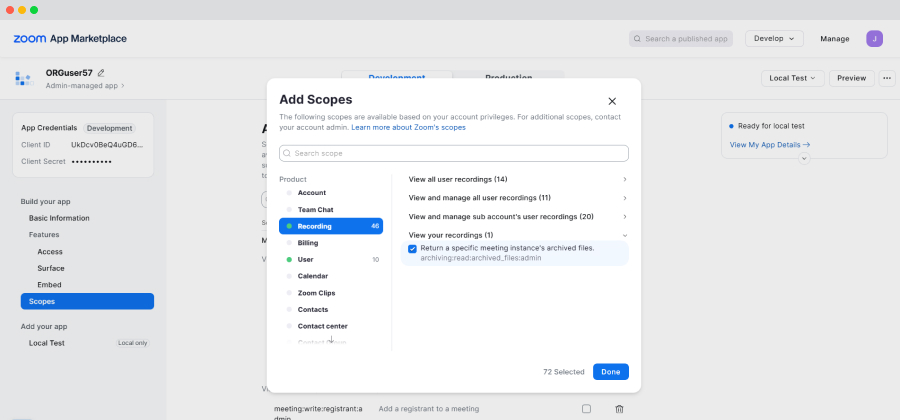
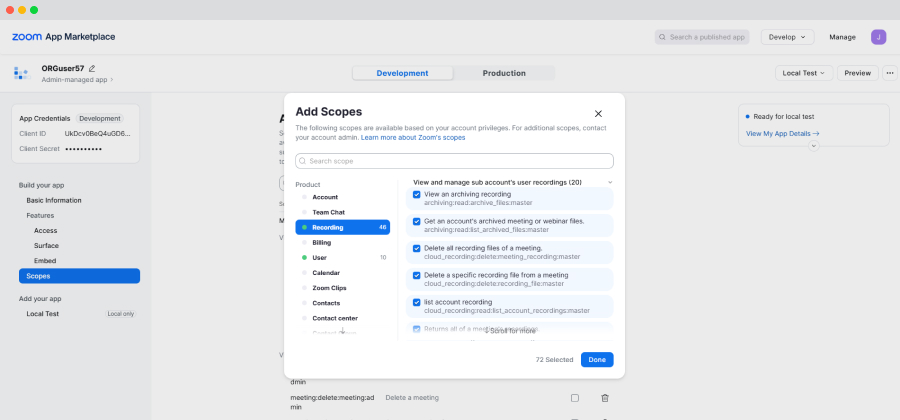
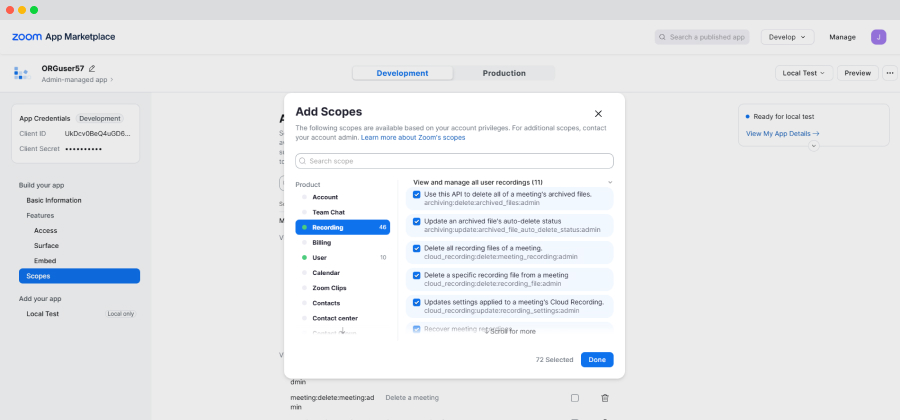
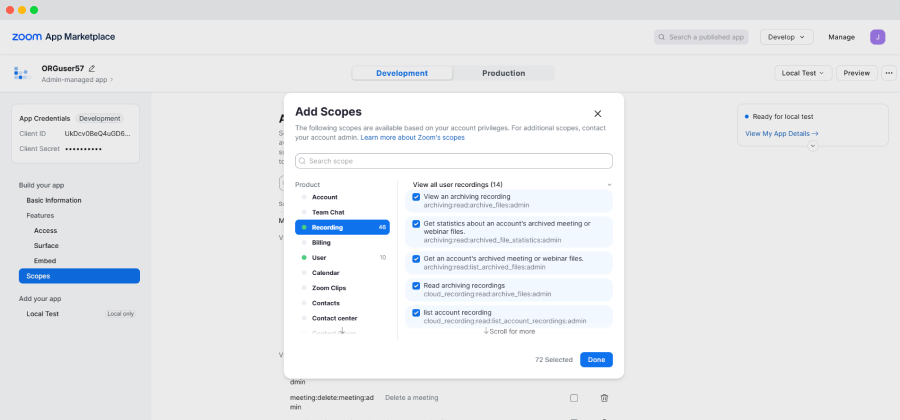
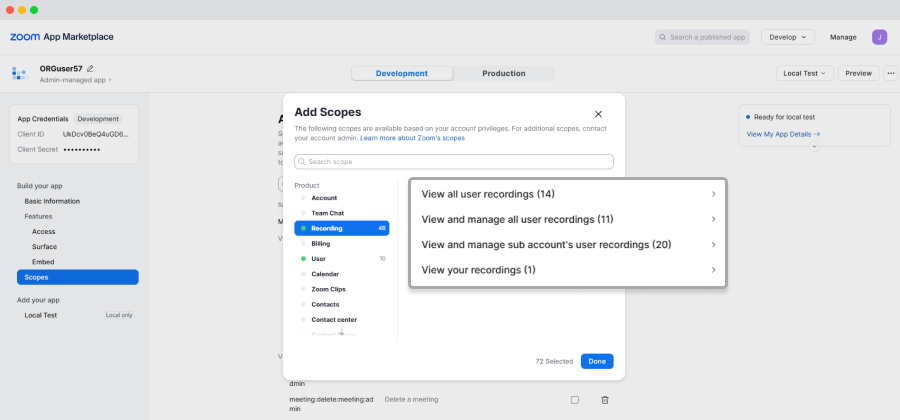
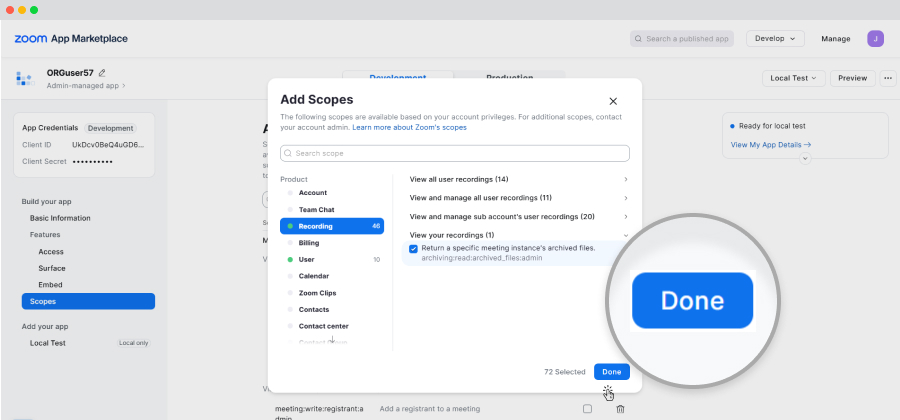
- For Recording, you need to click on the Scopes option.
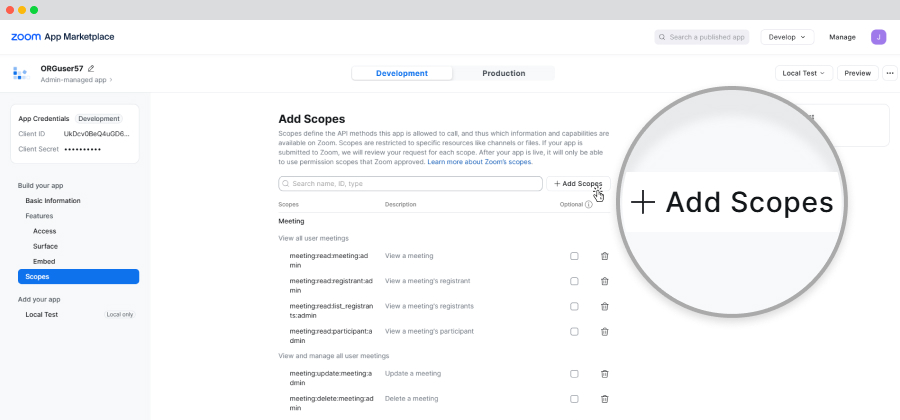
- Click on the Add Scope button.
- Need to enable all options for the recording.
- Click on the Done button.
Note: Need to enable the recording option from the Zoom Marketplaces

Here it is to be mentioned that, you can add as many Zoom meetings as you want in a specific event as per your requirements.
Zoom meeting time:
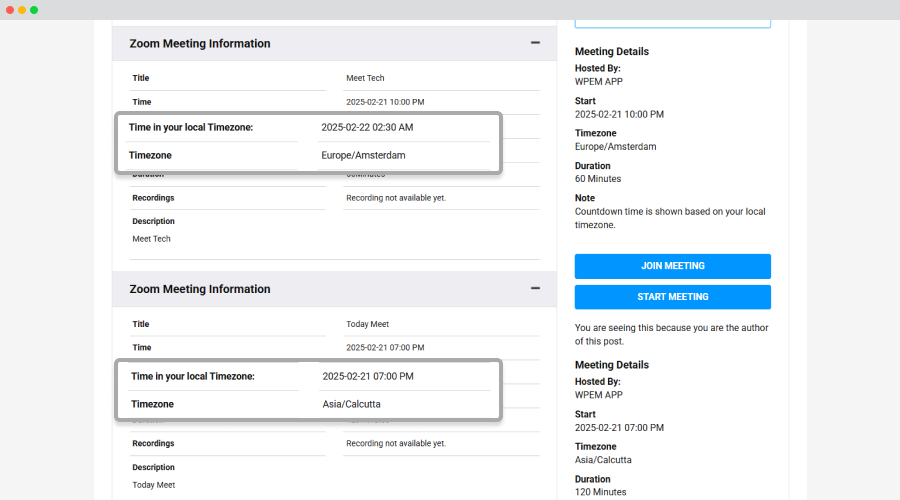
The Zoom meeting time that you add while filling up the meeting details based on your location will be automatically adjusted according to the location from where it is viewed. The meeting can be viewed in the Zoom Meeting Information section.
How to Add Timezone for Zoom meetings/webinars
The users can showcase the Zoom timezone only when they make the required changes in the settings section and enable the time Zone for each event.
To do that, perform For this please follow the below mentioned settings:
- Go to wp admin >> event manager >> settings >> Date and time picker.
- Here enable the “Select timezone for each event” option.

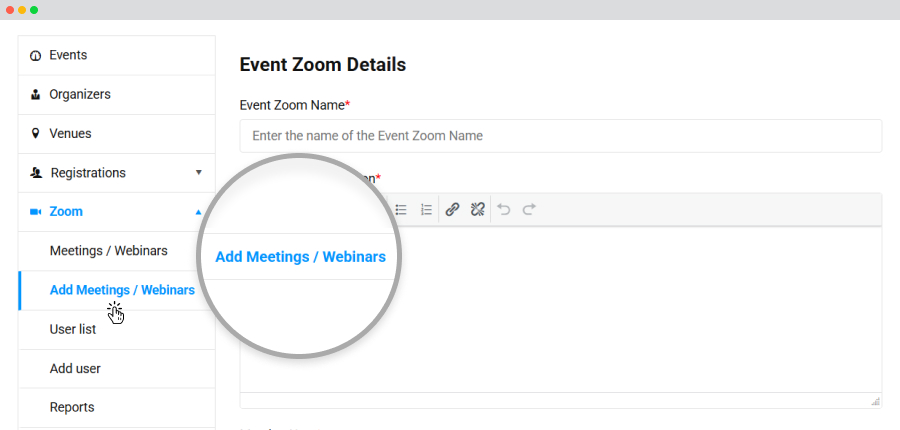
- Next go to Zoom >> Add new Meetings/ Webinars.
- Here, you get multiple timezone options to select from.

- After that your selected time Zone will be available on the frontend.

Please see the timezone availability comes from the options provided by the zoom, and anything else if entered may not provide the correct data.
Managing registrations
A user can easily manage registrations by using the Registration Addon.
Clicking on the number of event registrations displayed in the events table on the frontend event dashboard will redirect you on the registered attendee list page.
This page will display all those attendees who have registered for that specific event along with zoom meeting details.
Email Notifications
The event registration email will be sent to the organizer and attendees both after event registrations.
-
Go to WP-admin >> Event Registrations >> Notifications in the backend of your site.
Here, you could see two tabs:
- Organizer Notifications.
- Attendee Notifications.
- Customize the email message of the organizer and attendee and add the shortcodes that would display the details of Zoom meetings.

- Save changes.
How to Bind Sell Tickets to Zoom Meetings at the Admin panel
One can easily sell tickets for their online events using the sell tickets plugin. After the sell ticket plugin is installed, follow the below-mentioned steps:
- Go to Admin >> Event Manager >> Add New.
- Fill in the details of the events.
- In the section of adding tickets, you would find the Zoom meetings tab, select the Zoom meeting you want to bind the event ticket with.

- Save the ticket and publish the event.
Zoom Integration with WooCommerce
In order to link the Zoom meetings with WooCommerce, a user needs to have, WP Event Manager plugin, along with the Zoom and WooCommerce plugin.
After installing the WooCommerce plugin, the first step you need to take is to create a Zoom meeting.
Here are the steps you need to take,
- Go to Admin >> Zoom >> Add a new meeting.
- Fill in the details of the meetings.
- Integrate this meeting with WooCommerce with the box that is present on the right-hand side of the same page.
- Tick mark Enable purchase option, after which you need to mention the price of this meeting.

- After the price has been added, publish the meeting.
- Then the meeting will be converted into a Woo-Commerce product.
- Go to Admin >> Products >> All products.
- Here you will find the list of all your woo-commerce products. Click on the Name of the previously-created product(Zoom meeting) from the list.
- You would be redirected to a page that displays the details of the product. You need to link this product to the Zoom meeting.
- Click on the zoom connection in the list and find the product linked with the Zoom meeting.

- Update and publish.
- You will find the details of the Zoom meeting along with the Add to cart button on the Frontend product page.

- The participants can add products to the cart from here.
- Complete your payment process and the details of the order can then be seen on My account >> Zoom meeting page.

- The participants can access the meetings from here as well.
Meeting Reports at the Admin Panel
The plugin also allows organizers to get detailed reports of the meetings they organize through the following steps:
- Go to Admin >> Zoom >> Reports.
- Here you will see two tabs: Monthly report and Account report.
- Click on the Monthly report tab.
- Specify the month in the “Enter the month to check” section.
- Click on Export and all the details including meetings, new users, participants and meeting minutes in a spreadsheet.
- Similarly if you click on the Account report tab, you will get the following option:
- Specify the month in the “Enter the month to check” section.
- Click on Export and all the details including meetings, new users, participants and meeting minutes in a spreadsheet.


Setup Pages
1. Create Zoom Submit Page
- Create a new page, follow the path, WP Admin >> Pages >> New Page.
- Add a suitable title to it.
- Inside the content area, add the shortcode:[zoom_meeting_dashboard]

It is recommended for you to insert the shortcode into the WordPress visual editor to ensure it gets formatted correctly.
2. Create a Zoom Dashboard Page
- Create a new page, follow the path, WP Admin >> Pages >> New Page.
- Add a suitable title to it.
- Inside the content area add the shortcode:[submit_zoom_meeting_form].

It is recommended for you to insert the shortcode into the ‘text’ view of the WordPRess visual editor to ensure it gets formatted correctly.
Zoom Settings for the organizer at the Frontend
The users with the role of an organizer can also integrate their zoom account with the plugin. This can be done at the frontend by following the below-mentioned steps:
- Login to your account(Organizers).
- Go to the Zoom Meeting Dashboard >> Zoom settings.
- You would see a form in which you need to add the API details along with general settings.
- Enter details.
- Save changes.

This will enable the organizers to link their Zoom Account with the Plugin.
Add new zoom meetings at the Frontend
In order to create a Zoom meeting at the Frontend, follow the below mentioned steps:
- Go to the Submit zoom meeting option on the frontend.
- Submit all the information about the meeting, including its title, meeting date and time, host and agenda, specifications about the timezone, and meeting duration.

- The details related to registrations and alternative hosts are available only for the pro Users(Zoom plan) and hence selecting any of these may hamper your meeting creation if it is a free account.
- Submit.
- You can see the list of meetings created in the Zoom Dashboard section.

How to add New webinar from Frontend
In order to add a new webinar from the frontend, follow the below mentioned steps:
- Go to the Zoom meeting form on the frontend.
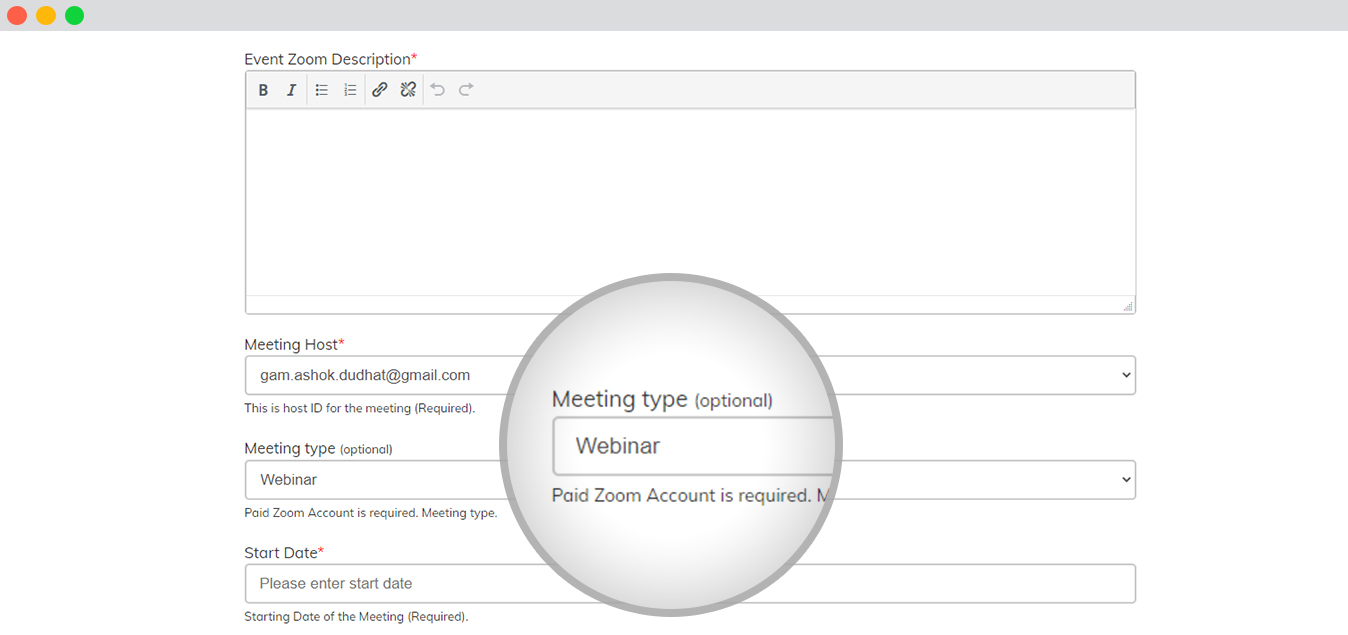
- Submit all the information about the webinar, such as title, date and time, host and agenda, specifications about the timezone, and duration.
- The details in regards to registrations, Panelists Video, HD video, practice session, Allow multiple devices, and alternative hosts are available only for the pro Users(Zoom plan), and hence selecting any of these may hamper your meeting creation, if it is a free account.
- Submit.
- You can see the list of Webinars created on the Zoom Dashboard page.

Note: After purchasing the plan, in your Zoom account go to the User Management menu > Users, Select the user and click on Edit. On the Edit User page, you will see the Features section.Check the Webinars option there to enable webinars in your account.


Add new users at the Frontend
- Go to your Zoom Dashboard >> Zoom User List >> Add new users.
- Fill in the required details:

- Action: The Admin needs to choose from the available actions that a user needs to perform while managing zoom meetings.
- Email Address: The email address that would be used by a user.
- First Name of the user.
- Last Name of the user.
- User Type.
- Submit.
Zoom users list at Frontend
In order to gain access to the list of all the users associated with the API mentioned,
- Go to the Zoom Dashboard >> Zoom User List.
- Here you get the list of all the users added to the same API.

When you add users to a Zoom website, you get the option to sync all of these users through the Backend by simply clicking on the Sync Zoom Users option.
How to Bind Zoom Meetings with Events at the Frontend?
- Go to post an event page.
- Submit the details of the events.
- In the section of zoom meetings, select the zoom meeting you want to bind this event with.

- Submit the event.
You would see the details of the zoom meetings on the event listing page.

How to Bind Sell Tickets to Zoom Meetings at Admin panel?
In order to bind the Zoom meetings with tickets, you need to,
- Go to post an event page.
- Submit the details of the events.
- In the section of ticket settings, you would find the Zoom meetings tab, select the Zoom meeting you want to bind the event ticket with.

- Submit the event.
- You would see ticket details along with the meeting details on the frontend.

How to Filter Hooks?
A list of few hooks are available below:
Basics:
add_filter(‘event_manager_zoom‘, function($data) { return $data; });
Examples:
-
Redirect to custom page url after Join via Web Browser completed or Unfinished.
add_filter(‘event_manager_zoom_join_meeting_via_app_shortcode’, function() { return ‘https://yoursiteurl.com/page’; }); -
Before Creating a Zoom User
apply_filters( ‘event_manager_zoom_create_user’, $data );
- Usage: Used when doing API calls for creating a user on Zoom.
Before Listing a Zoom User.apply_filters( ‘event_manager_zoom_list_users’, $data );
- Usage: Used when doing API calls for listing users from zoom.
Before getting a Zoom User.apply_filters( ‘event_manager_zoom_get_user_info’, $data );
- Usage: Used when doing API calls for getting a specific HOST ID info.
Before listing a meeting.apply_filters( ‘event_manager_zoom_list_meetings’, $data );
- Usage: Used when doing API calls for getting a list of meetings for a Zoom User.
Before Creating a meeting.
apply_filters( ‘event_manager_zoom_create_meeting’, $data );
- Usage: Used when doing API calls for posting your own data when creating a Meeting.
Before Updating a meeting.
apply_filters( ‘event_manager_zoom_update_meeting’, $data );
- Usage: Used when doing API calls for posting your own data when updating a Meeting.
Before Getting a meeting.
apply_filters( ‘event_manager_zoom_get_meeting_info’, $data );
- Usage: Used when doing API calls for getting meeting info.
Before getting daily reports data.
apply_filters( ‘event_manager_zoom_get_daily_report’, $data );
Usage: Used when doing API calls for when pulling in reports data.
Sidebar links to free Zoom webinars (on demand)
With the Zoom plugin of WP Event Manager, you can display the links of free Zoom webinars on the sidebar of your page.
Add below mentioned code snippet to the functions.php
add_action('single_event_zoom_meeting_overview_after', 'YOUR_THEME_zoom_meeting_overview_after');
function YOUR_THEME_zoom_meeting_overview_after()
{
	global $post;

	$user_id = get_current_user_id();

	$event_id = $post->ID;

	$event_zoom_id = get_post_meta($event_id, '_event_zoom_id', true);

	if(!empty($event_zoom_id))
	{
		$meeting_type = get_post_meta( $event_zoom_id, '_meeting_type', true );
		$meeting_type_title = ($meeting_type === 'webinar') ? __('Webinar', 'wp-event-manager-zoom') : __('Meeting', 'wp-event-manager-zoom');

		$meeting = get_post_meta( $event_zoom_id, '_meeting_zoom_details', true );

		if( !empty($meeting) && isset($meeting->id) && !empty($meeting->id) )
		{
			?>
			<div class="wpem-zoom-sell-ticket-button-wrapper">
            	          <a href="<?php echo $meeting->join_url; ?>" class="wpem-theme-button wpem-zoom-sell-ticket-button">
                            <span><?php printf(__('Join %s', 'wp-event-manager-zoom'), $meeting_type_title); ?></span>
                          </a>
                        </div>
			<?php
		}
	}
}
It is to be mentioned that this feature is available only on demand.
Adding registrants with custom queries
To add registrants with custom queries, here is the code that you need to paste in function.php:
<?php
add_filter( 'event_manager_zoom_add_attendees_data', 'wpem_zoom_add_attendees_data_custom_questions', 10 );
function wpem_zoom_add_attendees_data_custom_questions($args)
{
	$args['custom_questions'][] = [
		'title' => 'Qualifica professionale',
		'value' => $_REQUEST['qualifica_professionale'], //qualifica_professionale is registration form field name
	];

	$args['custom_questions'][] = [
		'title' => 'Attendees City',
		'value' => $_REQUEST['city'], //city is registration form field name
	];

    return $args;
}
?>
Adding a custom field to the registration form
Here is the code you need to paste in function.php to add a custom field to your registration form:
<?php
add_filter( 'event_manager_zoom_add_attendees_data', 'wpem_zoom_add_attendees_data_custom_questions', 10 );
function wpem_zoom_add_attendees_data_custom_questions($args)
{
	$args['address'] = $_REQUEST['attendee_address'];
	$args['zip'] = $_REQUEST['attendee_zip'];
	$args['phone'] = $_REQUEST['attendee_phone'];

    return $args;
}
?>
Adding Questions to Zoom Meetings
Now the Zoom addon allows users to ask questions before entering the meeting room to tighten security
To enable the feature you need to add the following steps:
- Go to wp-admin.
- Click on Zoom.
- Select the “Settings” option from the dropdown.
- Here at the end of the page, you will find the “Allow questions” option which you need to check to enable.
- Save changes.
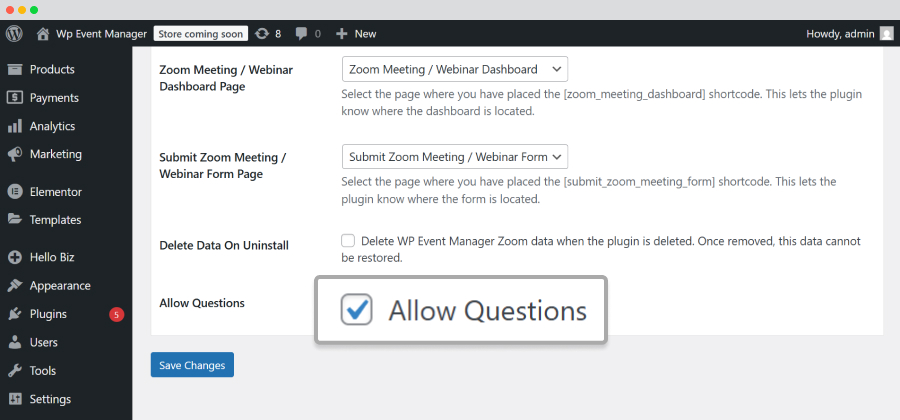
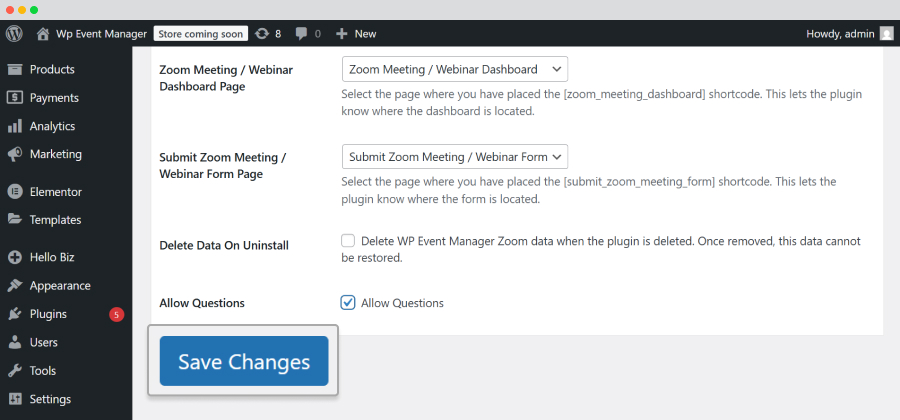
Once you enable the option, you will be able to add questions to your zoom meetings.
Now follow the below mentioned steps to add questions to each meeting:
- Go to Zoom.
- Click on Add meetings/webinar.
- Here you will find the Meeting Questions section where you need to fill in your questions along with other details.
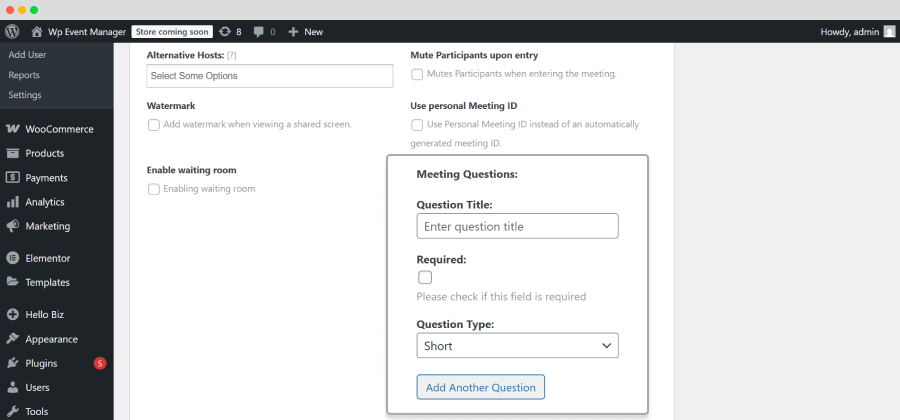
Your specified question will be added to your Zoom Meeting.
The question can also be added from the front end. For which the organizer needs to login to the event dashboard and go to the Zoom section to add a new meeting. In the add new meeting page he or she needs to fill in the question and its details just like the admin side.
 Use coupon code:
  Something exciting is coming soon – stay tuned to find out! 🚀✨