Organizer App
The mobile application offered by WP Event Manager brings the entire event management system to your app. Starting from accessing attendee details to handing check-ins and check-outs everything can be done through the Organizer App.
Installation
The Organizer App can be downloaded from your Android as well as IOS phones.
Android users can install the app from the Play store and IOS users can install it from the App Store.
Once you install the plugin, you need to enter the Website URL and API Key generated on the website . To know how you can generate REST API please click here. (https://wp-eventmanager.com/knowledge-base/rest-api/)
Note: Need to required plugins for the Mobile App: WP event manager, Sell tickets, Registration, Guest and WooCommerce plugins.
For example,
Website URL: www.example.com
API Key generated on the website is: 1505832294
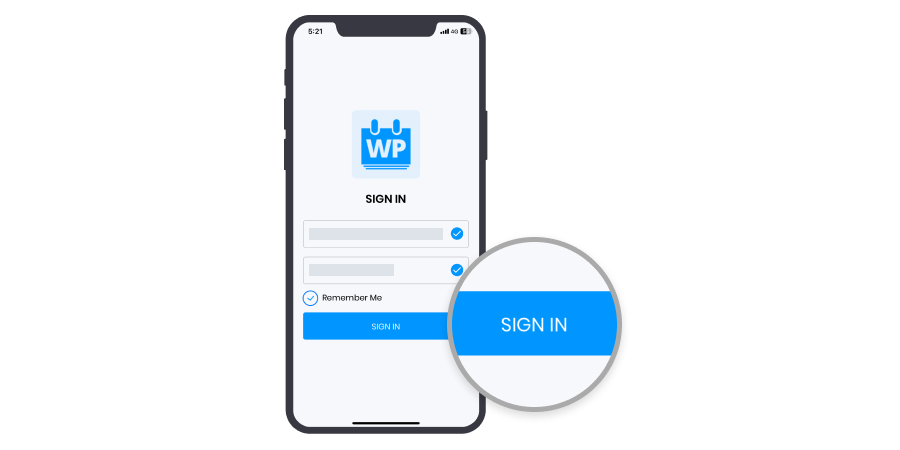
Mobile application settings
In order to know more about the settings available to the users, one needs to click on the settings button present at the top left corner of the Application that shows three lines.
Here is the list of settings available for the organizers:
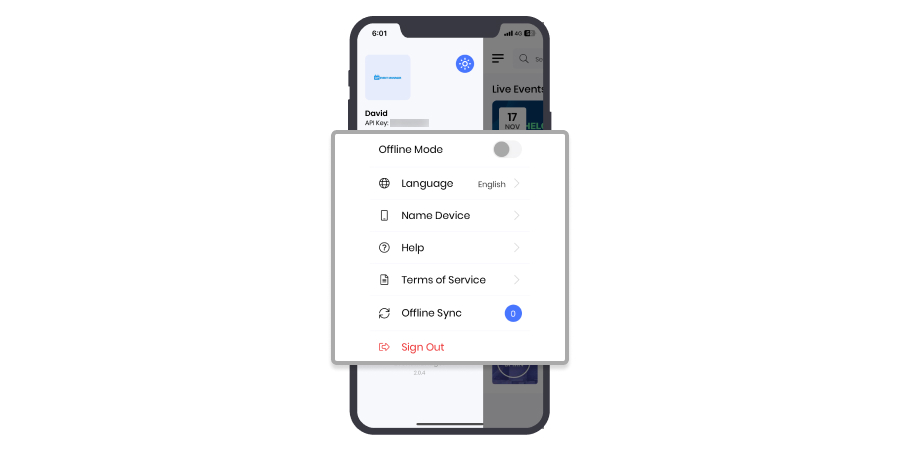
1. Offline Mode: Enable/Disable.
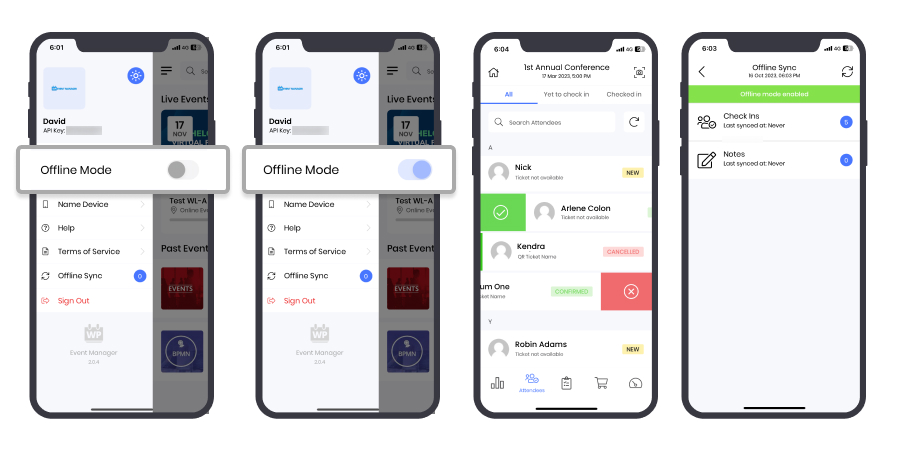
When offline mode is enabled, it lets the application store the attendee’s check in information on the device, and syncs the whole check in and check out data with the server when the offline mode is turned off.
In order to sync the attendee data in offline mode, go to the settings menu and perform the following functions:
Step 1: Enable Offline Mode, after which the color of the application will automatically change.
Step 2: Go to the home page where you can see Live Events and Past Events.
Step 3: Click on the View All option at the Live Events section.
Step 4: Choose your preferred events from the list and click on it.
Step 5: Here at the end of the page you will get multiple icons to perform various tasks. You can find the Attendees icon among them which you need to click on.
Step 6: You can see the list of all attendees over here. You can swipe left to right to check in your preferred attendees from the list.
How does the offline mode work?
Follow the below mentioned steps to work with the offline mode:
- First, enable the offline mode, present at the settings section.
- Go to live events and click on View all.
- Choose your preferred event and click on it.
- Open up the attendees section that is present at the bottom of the page. Select attendees from the attendee list and swipe right to check in.
- Go to the settings section and disable the offline mode.
- Then click on the Offline Sync option.
- Here you get two options: Check ins and Notes. In the check-ins section you can view the number of attendees you have checked in through right swipes.
- Click on the Sync option and refresh.
- You will get a message confirming that your attendee check in data is synced.
Due to the offline mode the check in status will not be displayed even after checking in. When offline mode is turned off, you get to see the data synced, and participants checked in.
2. Language
The Language option is available under the Offline option at the Settings section.
Currently, only the English language is available but the users will get other language options in its upcoming version.
3. Selecting the Theme (Dark/ Light)
This is a facility that is offered to enhance the user experience. With the Theme mode option, they can choose their preferred mode that they want to use in their app.
Users can find the Theme icon at the top right of the settings section. By just clicking on the icon the mode can be changed to dark or light.
When the user selects the light (default) theme mode, the screen becomes a combination of white and the app branding color chosen over the REST API.
4. Name the device
The device needs a name so that it becomes easy for the organizer to identify the number of attendees that have checked in with a particular device. The same name that you have entered here will be seen on the arrival menu later. This field is a compulsory field, as it is the only source from where you can check which user has checked in with which device.
5. Help
The Help option at the Settings section redirects users to the knowledge base section of the WP Event Manager plugin.
6. Terms of services
Terms and conditions are important legal documents for developers and owners, as they establish the rules and restrictions for app usage. Terms and conditions for Organizer Apps help protect your intellectual property, prevent misuse of your app, and limit legal disputes.
Please click here to know the terms of using our product.
7. Offline Sync
The Offline sync option helps save attendee check-in data even when you are offline.
The below mentioned steps to work with the offline mode:
- First, enable the offline mode, present at the settings section.
- Go to live events and click on your preferred event.
- Open up the attendees section that is present at the bottom of the page. Select attendees from the attendee list and swipe right to check in.
- Due to the offline mode the check in status will not be seen. When the internet connection restores, go to the offline sync option. Here you can access all the details of the checked in attendees.
8. Sign out
You can click on the sign out option to get out of your current account.
Event Listings Menu
Once you open the app you can see two types of events in the Events listing section.
- Live Events: It displays the list of live events.
- Past Events: it displays the list of past events.
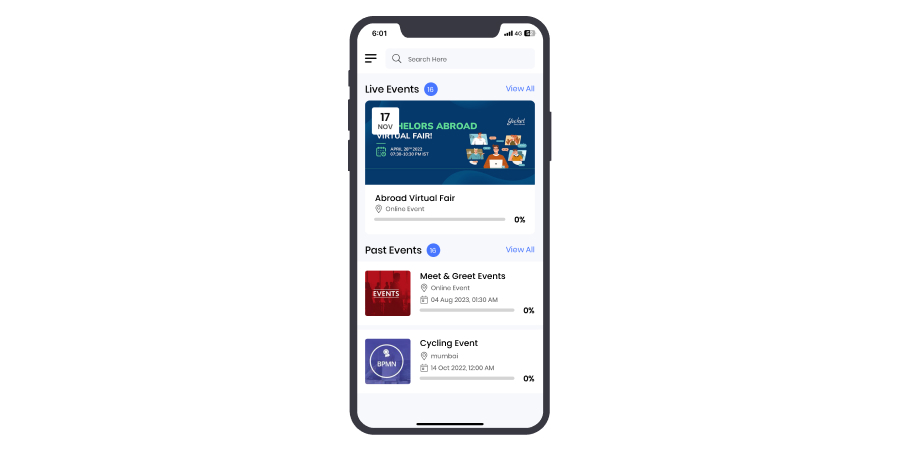
1. Live events
Go to the View All option present right beside the live events to access the list of Live events.
A. Event Dashboard
Go to the Live events list and click on your preferred events from the list.
Once you click on your preferred event you will be redirected to the specific event dashboard where you will get the below mentioned details.
Core plugin: when you have only the core plugin installed in your system, you can view the following details.
- Total number of views.
- Total Venues.
- Total Organizers.
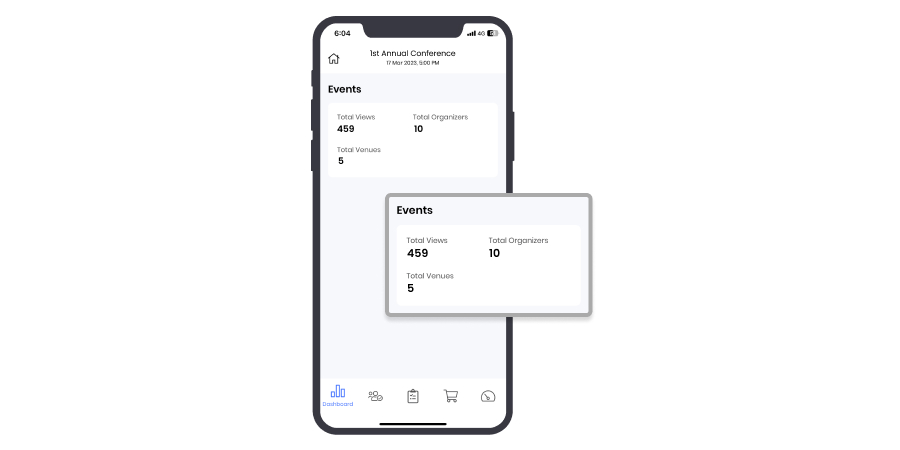
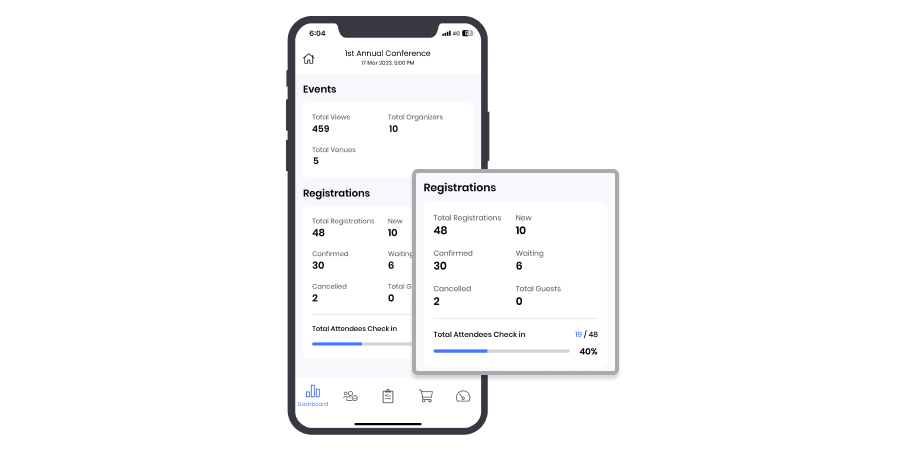
Core plugin+Registration: when you have the Registration plugin installed along with the core plugin, you can get the following details.
- Total registration.
- New.
- Confirmed.
- Waiting.
- Canceled.
- Total guests.
You can also see the Total Attendee Check ins here. Besides this a registration percentage will also be there.
Core + Registrations + Sell tickets: when you have both the Registration and Sell Tickets plugin installed along with the core plugin you can get the following details along with the above mentioned ones.
- Ticket sales: Here you can access the ticket sales based on your selected time period: daily, weekly, monthly.
- Total number of tickets sold and their percentage along with their details.

2. Past events – This page shows the list of all the events that have already occurred in the past.
B. Attendees
Besides the event dashboard, you will get the attendees icon by clicking on which you can view the list of attendees.
The attendee menu displays the name of all the users who have registered for the event selected, along with the tabs that display the users who have already checked-in and users who are yet to check in.
The user check-in option depends on the plugins used by the admin.
- Attendee Menu with the core plugin
The Menu would display “We did not find any attendees” because the registration functionality does not come with the core plugin alone.
Attendee Menu with core plugin + Registration Plugin
With the Registration plugin installed, the menu displays the total number of users that have registered for the event.
Here, you can see the list of users in an alphabetical order. When you click on a particular name from the list, the details of that user can be seen that he or she has added at the time of registration.
The users can check-in directly by swiping right on their names or they can also check-in by simply clicking on the check-in button that could be seen when they click on their names. Similarly, they can check-out by swiping left on their names.
Attendee Menu with core plugin + Registration Plugin + Sell tickets
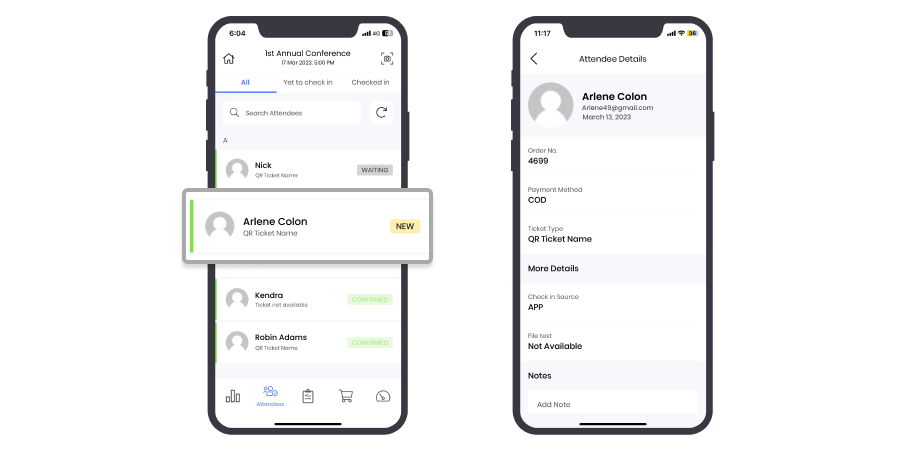
With the Sell ticket plugin installed, the menu displays the total number of users who have registered for the event along with their ticket details that are mentioned below.
- Order number.
- Delivery method.
- Ticket type.
- Barcode.
More details:
- Check-in source.
- Last name.
- Phone.
- Notes.
Attendee scanner
With the Sell ticket plugin installed, the menu displays the total number of users who have registered for the event.
Here, you can see the list of users in an alphabetical order. When you click on a particular name from the list, the details of that user can be seen that he or she has added at the time of registration.
The users can easily check-in by scanning the QR code that is given to them at the time of purchasing tickets in a PDF form on their mail Ids.
The scanner is present right beside the name of the event in the Attendee menu. Once the barcode is scanned the user is automatically checked-in at the entry gate.
The users can check-in directly by swiping right on their names or they can also check-in by simply clicking on the check-in button that could be seen when they click on their names. Similarly, they can check-out by swiping left on their names.

C. Guest List
The next option is the Guest list option that displays the list of guests that you have created. If you do not have the Guest list addon installed in your system, this section will be empty.

D. Order
The menu order showcases the list of Users who have purchased the tickets for the events.
Order Menu with the core plugin – The Menu displays “There are no orders” because users can buy tickets only with the “Sell Tickets Add on”. The core plugin does not come with the tickets functionality.
Order Menu with core plugin + Registration Plugin – The Menu displays “There are no orders because users can buy tickets only with the Sell Tickets Add on”.The core addon and registration addon do not come with the functionality of Tickets.
Order Menu with core plugin + Registration Plugin + Sell tickets – The menu showcases the list of users that have purchased the tickets of your events.
You can see the Order details of the ticket purchased by clicking on the names of the users. It will display which ticket has been bought by the user.
Also, you can send the email to users directly from the order section.
- Click on the participant name.
- You will get details of the order placed by the participant.
- Click on the email icon present on the page.
- You will be auto directed to your default mail service provider, like Gmail.
- An automated message that you can individually alter is typed here, which you can directly send to the user.
- The users receive the mail individually.
- Order Menu with the core plugin – The Menu displays “There are no orders” because users can buy tickets only with the “Sell Tickets Add on”. The core plugin does not come with the tickets functionality.
- Order Menu with core plugin + Registration Plugin – The Menu displays “There are no orders because users can buy tickets only with the Sell Tickets Add on”.The core addon and registration addon do not come with the functionality of Tickets.
- Order Menu with core plugin + Registration Plugin + Sell tickets – The menu showcases the list of users that have purchased the tickets of your events.

E. Arrival
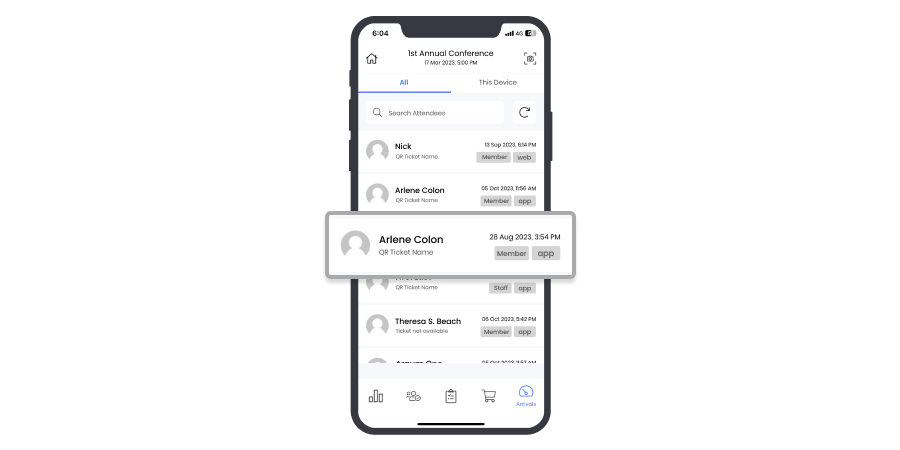
The arrival menu displays the list of all the users who have arrived at the event.
It has mainly three sections:
- All: it displays the list of all attendees that have checked in.
- This Device: it shows the list of all the attendees who have checked in through the device or web application.
- QR code scanning icon: To scan QR code.
Notification for license expiry or deactivated plugins
WP Event Manager users can continue accessing our mobile application even after deactivating a specific plugin or plugins or expiry of the license.
In case of license expiry or plugin deactivation, logged in users will get notifications once they open the mobile app.
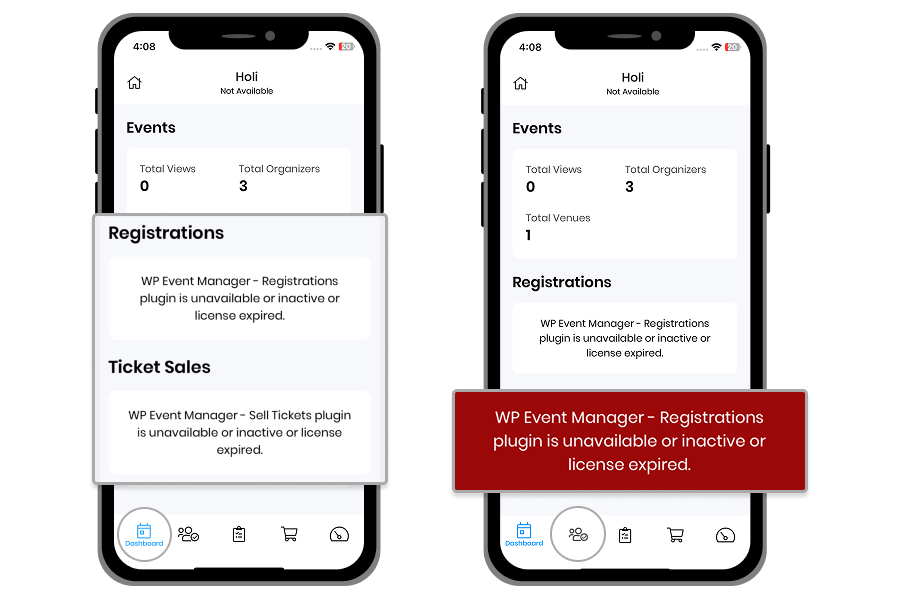
Once a user logs into our mobile app, he or she comes across multiple sections that include Dashboard, attendee list, tickets etc. If any related plugin like Sell Tickets, Registration and Guest is deactivated, the user instantly gets a notification.
Based on the section the following notifications are displayed:
For dashboard
The Sell-ticket plugin is required for the ticket section.
The Registration plugin is required for registration details.
For the Attendee section
The Attendee information plugin is required for attendee details.
For the arrival registration plugin is required.
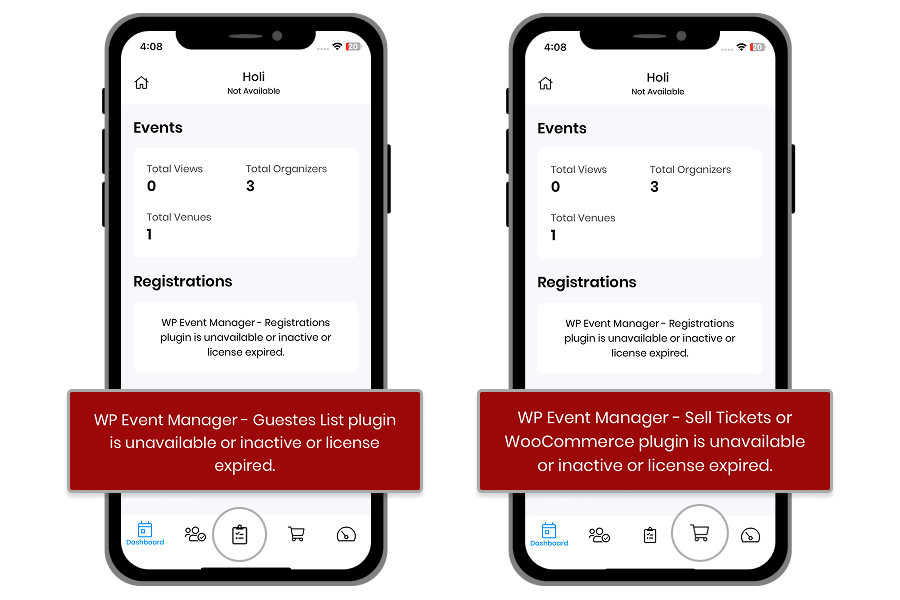
For the Guest section
To access the guest list, the Guest List plugin is required
For the Order section
For the order screen wp-event-manager-sell-tickets and woocommerce plugins are required.
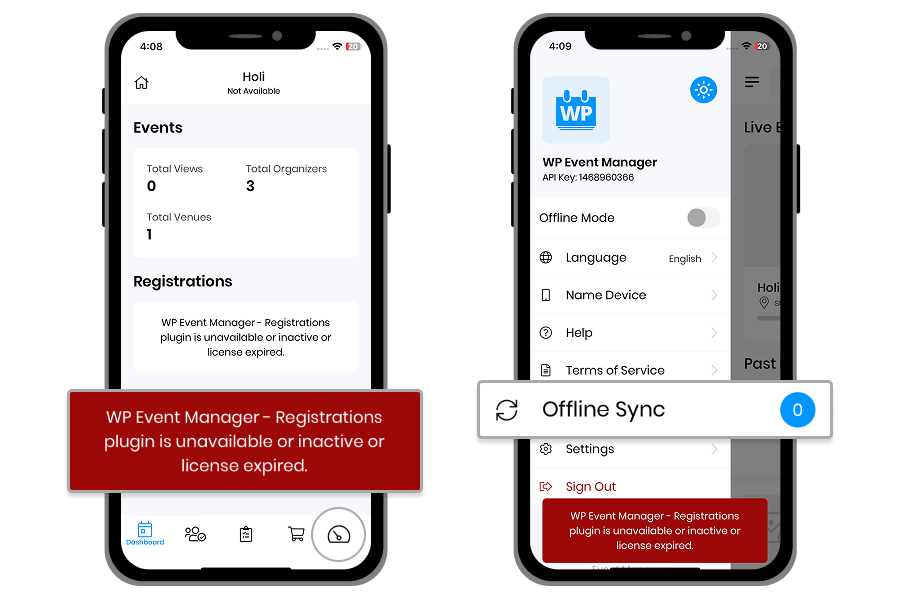
For the Arrival section
The Registration plugin is required for the Arrival section.
For offline sync, the Registration plugin is required.
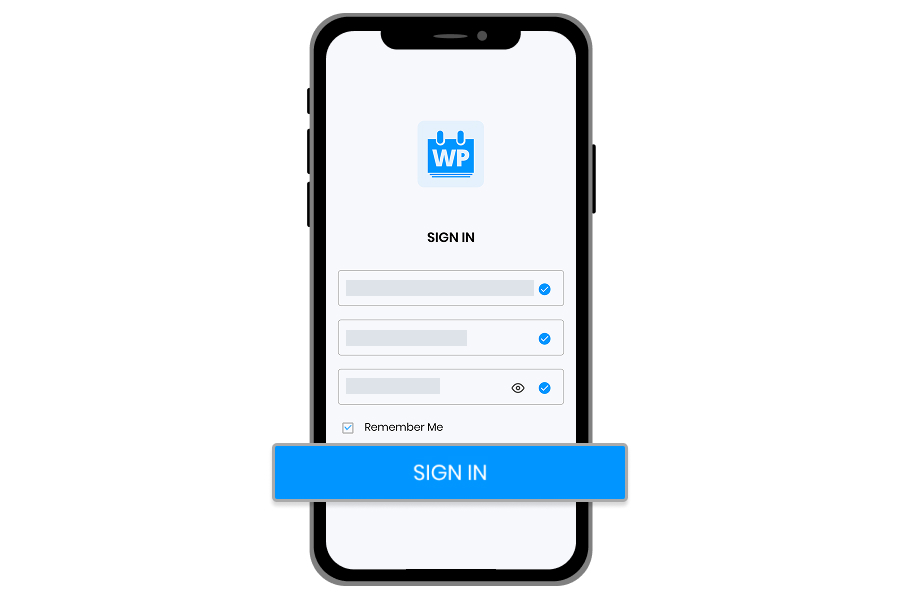
Log in with your Username and password
Now, you can use your username and password to log in to your organizer account on the mobile app instead of APK id.
Registration check-in on mobile app
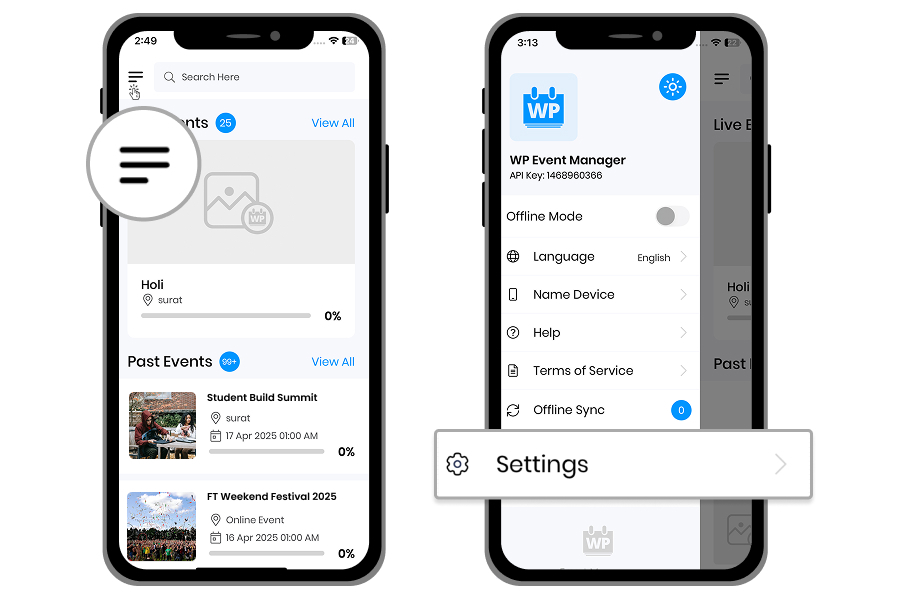
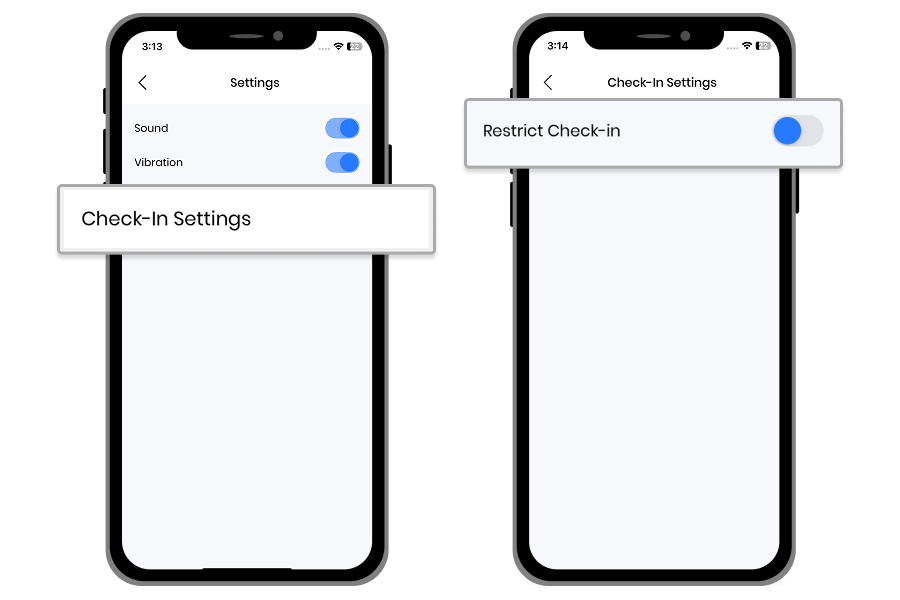
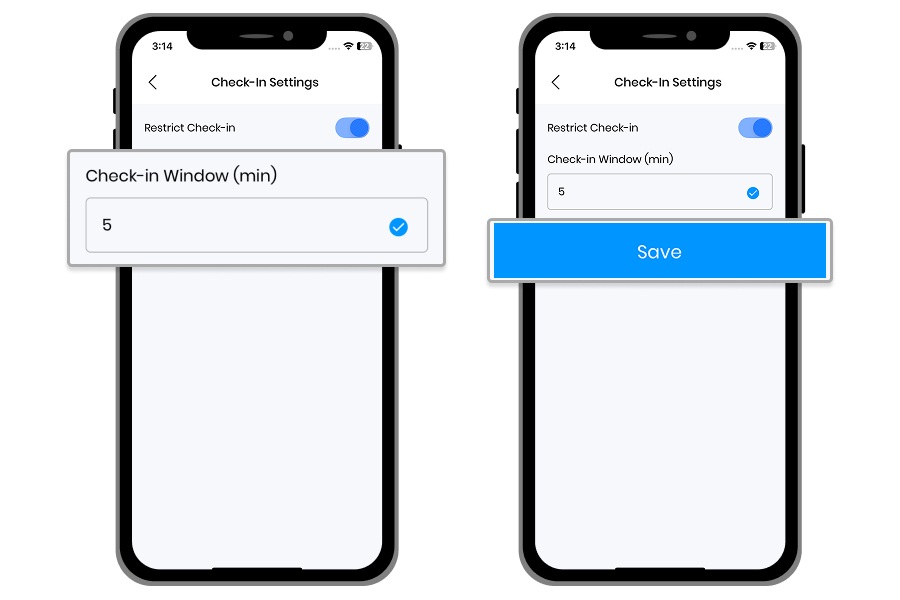
Now, event organizers can easily set a limit for the check-in time frame,e which means attendees will be able to check in only within the specified time frame. To set the time duration, here are the steps you need to take:
- Open the Drawer menu.
- Click on Settings.
- Click on the Check-in setting option.
- Enable the Restrict check-in button
- Add time in the check-in window
- Click on the save button.
 Use coupon code:
  Something exciting is coming soon – stay tuned to find out! 🚀✨