Colors
The colors addon is used to differentiate event type and event category tabs with colors.
Installing the plugin
The installation process is the same for all the addons, offered by WP Event Manager. They can be both installed automatically and manually.
- Automatic Installation: You can install the plugin from the backend of your WordPress. Click Here to see how you can install the plugin automatically.
- Manual Installation: You can install the plugin from the backend of your WordPress. Click Here to see how you can install the plugin manually.
Complete Video Guide On Colors Add On
How to set colors to your event category?
In order to differentiate one event category from others and let it get highlighted to the users and visitors, one can set colors to the various event categories that have already been created before.
Follow the below mentioned steps to add colors to different event categories:
- Go to wp-admin>>Events Manager.
- Click on the “Event Category” option from the dropdown.
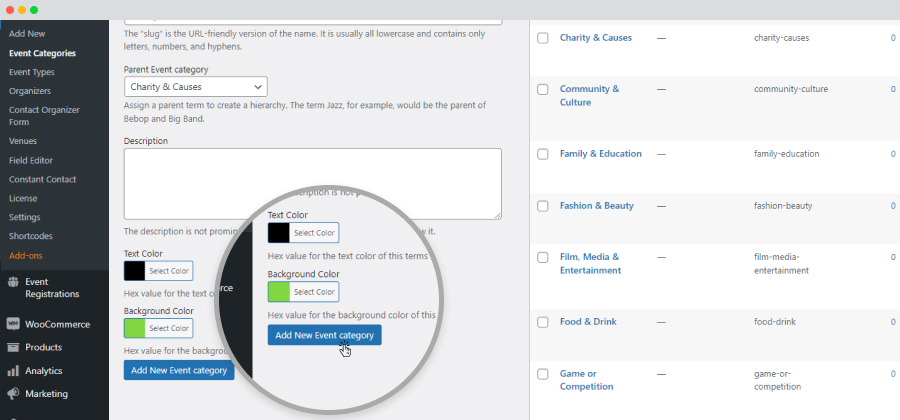
- Here you need to fill up the details of the new event category which include the following:
- Name.
- Slug.
- Parent event category.
- Description.
- Set different colors for each category:
- Text Color: This color would be set as the “text color” of this event category.
- Background Color: This color would be set as the “background color” of this event category.
- Click on the Add New Event Category option.

The color would appear as follows at the front end on the single event page.

How to set colors in different Event Types?
In order to differentiate one event type from others and let it get highlighted to the users and visitors, one can set colors to the various event types that have already been created before.
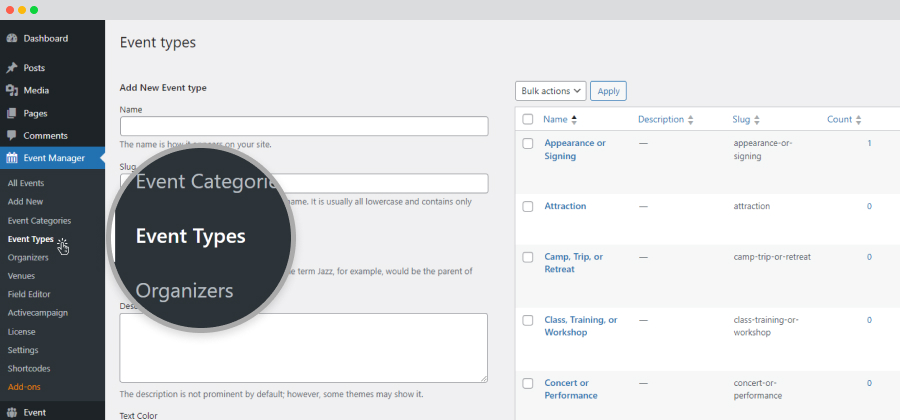
- Go to wp-admin>> Events Manager.
- Select Event types from the drop down.
- Here you need to fill up the following details in the “Add New Event Type” section.
- Name.
- Slug.
- Parent Event Type.
- Description.
- Set different colors for each type:
- Text Color: This color would be set as the “text color” of this event type.
- Background Color: This color would be set as the “background color” of this event type.
- Click on the “Add New Event type” option.


Here you can see the list of all the event types created before.
How to set colors for different event sections?
In order to add colors to different sections of an event, follow the below mentioned colors. Adding colors lets you highlight different areas of your event to your site visitors.
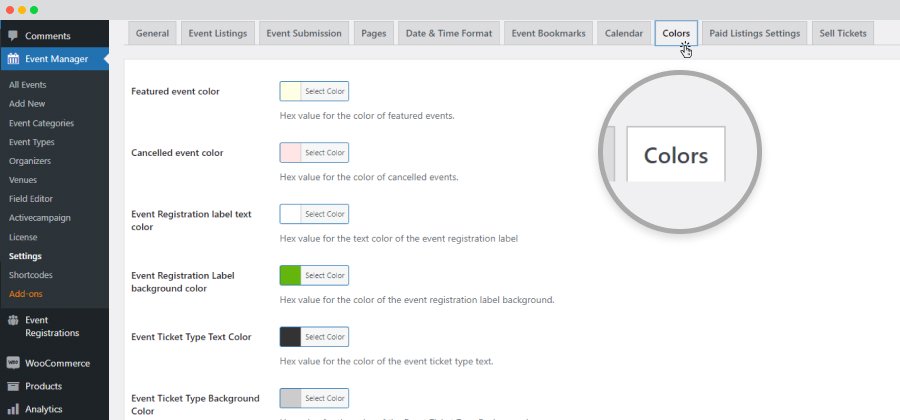
Go to Admin >> Events Manager >> Settings >> Colors tab.

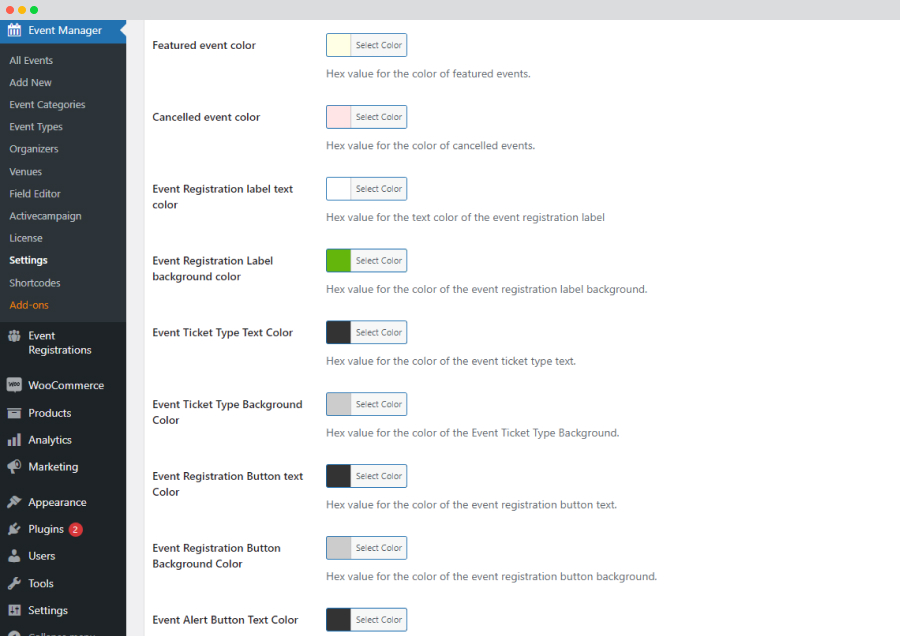
Here are the settings options you will get in this section:
- Featured Event color: you need to select a color for featured events.
- Canceled Event Color: you need to select a color for canceled events
- Event Registration label text color: you need to select the text color of the event registration label.
- Event Registration Label background color: you need to select the background color of the event registration label.
- Event Ticket Type text color: here, you need to select the text color of the event ticket type.
- Event Ticket Type Background Color: you need to select the color of the event ticket type background.
- Event Registration Button Text Color: you need to select the text color of the event registration button.
- Event Registration Button Background Color: you need to select the background color of the event registration button.
- Event Alert Button Text Color: you need to select the text color of the event alert button.
- Event Alert Button Background color: you need to select the background color of the event alert button.
- Event Bookmarks Text Color: you need to select the text color of event bookmarks.
- Event Bookmarks Background Color: you need to select the background color of the event bookmarks.
- Event Registration New Status Text Color: you need to select the text color of the event registration new status.
- Event Registration New Status Background Color: you need to select the background color of the event registration new status.
- Event Registration Waiting Status Text Color: you need to select the text color of the event registration waiting status.
- Event Registration waiting Status background Color: you need to select the background color of the event registration waiting status.
- Event Registration Confirmed Status Text Color: you need to select the text color of the event registration confirmed status.
- Event Registration Confirmed Status background color: you need to select the background color of the event registration confirmed status.
- Event Registration Canceled Status Text Color: you need to select the text color of the event registration canceled status.
- Event Registration Canceled Status Background Color: you need to select the background color of the event registration canceled status.
- Event Registration Archived Status Text Color: you need to select the text color of the event registration archived status.
- Event Registration Archived Status Background Color: you need to select the background color of the event registration archived status.
- Event Registration Check-in Status Text Color: you need to select the text color of the event registration check-in status.
- Event Registration Check-in Status Background Color: you need to select the background color of the event registration check-in status.
- Event Registration Undo Status Text Color: you need to select the text color of the event registration undo status.
- Event Registration Undo Status Background Color: you need to select the background color of the event registration undo status.
- Event Manager Donation Ticket Text Color: you need to select the text color of the event manager donation ticket.
- Event Manager Donation Ticket Background Color: you need to select the background color of the event manager donation ticket.
- Event Manager Paid Ticket Text Color: you need to select the text color of the event manager paid ticket.
- Event manager ticket paid background color: you need to select the background color of the event manager paid ticket.
- Event Manager Free Ticket Text Color: you need to select the text color of the event manager free ticket.
- Event Manager Free Ticket Background Color: you need to select the background color of the event manager free ticket.
- Apply Colors To The Calendar: you need to select the background color of the event link on the calendar.

The color would appear as follows at the front end on the single event page.
Advanced: Overriding/Customizing the templates
For overriding or customization, template files can be found in the wp-event-manager-sell-tickets/templates/ directory.
To override a template file, follow the below-mentioned steps:
- Create directory “wp-event-manager-colors” under your theme folder.
- Copy the template file to “/wp-content/yourtheme/wp-event-manager-colors/” directory.
- Your theme will now use all the template files from the “/wp-content/yourtheme/wp-event-manager-colors/” directory instead of the plugin’s template file (/wp-content/plugins/wp-event-manager-colors/).
Remember: If you have an overridden template file and plugin frequently updating then you need to sync template file with new updates from the plugin’s template file for better functionality and new features.
 Use coupon code:
  Something exciting is coming soon – stay tuned to find out! 🚀✨